
I recently set myself a challenge: complete an Elden Ring run with two Bandit’s Curved Swords, but not the usual bloody way. I wanted to see how hard I could push these two little blades by pouring every rune into Faith and setting the whole thing on fire. Turns out: very hard.

The Scorched Faithful: Faith Fire Build Guide
Faith builds in Elden Ring have a reputation problem. Mention one to a random Tarnished and they’ll immediately picture sacred damage, golden buffs, and very slow weapons. The Scorched Faithful would like a word. This build takes Faith as its primary stat and channels every point into fire – coating two fast curved swords in flames, stacking a sequence of multiplicative damage buffs, and then diving off the nearest ledge onto anything foolish enough to stand still. It’s melee-first, aggressive, and honestly a bit ridiculous when everything is active at once.
The Concept at a Glance
The core of the build is a pair of Bandit’s Curved Swords running the Flame Art affinity and the Flaming Strike Ash of War. Flame Art is the crucial distinction from standard Fire infusion – rather than converting weapon scaling to Strength, it shifts that scaling entirely to Faith. Every level you put into your primary stat feeds both your weapon damage and your incantations simultaneously. Nothing is wasted.
The Flaming Strike skill has two parts: an initial forward arc of flame (L2), followed by a sweeping heavy attack that leaves your blade coated in fire (L2 then R2). That coated-blade state is what you’re after in boss fights. Combined with a jump attack rhythm amplified by the Claw Talisman and Raptor’s Black Feathers, your damage when everything stacks becomes genuinely difficult to argue with.
Starting Class: Prophet or Confessor?
The Prophet opens with 16 Faith and arrives already holding a Finger Seal and the Catch Flame incantation – you can throw fire before you’ve done anything else. The trade-off is fragility: lower starting Endurance (8 vs the Confessor’s 10) means carrying heavier gear or managing stamina more carefully in those first few hours. The Confessor starts with better physical foundations (notably higher Endurance, Strength, and Dexterity) making the opening stretch more forgiving, though you’ll need to obtain your incantations from whatever source rather than having them in hand from the start. Both classes begin at identical Vigor (10), so neither has a meaningful HP advantage early. Pick Prophet if you want to lean into the fire identity immediately; pick Confessor if you’d rather not worry about stamina while you find your footing – that’s actually what I did for the run.
Phase 1: The Foundation
Stat priority
Vigor to 30 first (well, at least go for 20) – nothing derails a build like dying every three hits. Then Faith to 15, which unlocks your first essential incantation. Intelligence, Arcane, and Strength can sit at starting values for the entire game (unless you opt into one of the variations discussed later).
Hunting the Bandit’s Curved Swords
These are your weapons for the rest of the run. They’re widely considered among the best options for elemental infusions due to their solid base damage for a curved sword, low weight, and low stat requirements of 11 Strength and 13 Dexterity. They drop from skeletons wielding them – one reliable early target is the graveyard to the left of the Church of Pilgrimage in the Weeping Peninsula, just outside the church door. The drop chance sits at roughly 1.5% per weapon slot, meaning each dual-wielding skeleton gives you two separate rolls per kill. It can still take a while.
Green Turtle Talisman
Found in a chest on the eastern outskirts of Summonwater Village in East Limgrave. It raises Stamina recovery speed by 8 per second (about a 17% increase). You need to spend a Stonesword Key to enter the cellar where you find the talisman and there is no need to fight the Tibia Mariner boss in the area.
Claw Talisman
Before leaving Stormveil, grab this from a watchtower reached by exiting the Rampart Tower Site of Grace, working across the rooftops, and climbing a ladder. The Claw Talisman boosts jump attack damage by 15% – it’s the first pillar of this build’s damage output, and it’s available before you’ve barely started.
Flame, Grant Me Strength
With 15 Faith, make the trip to Fort Gael in western Caelid. The incantation sits on a corpse behind the fort, between two Flame Chariots. You don’t need to fight through the fort, just circle around and snatch it from outside, baiting one chariot away with Torrent if needed. It raises both physical and fire attack power by 20% in PvE for 30 seconds. Even with placeholder weapons, that number matters.
Flask
Mix whatever helps you survive at this stage. The Greenspill Crystal Tear for additional stamina is a reliable companion until the fire-specific tears become available. The Faith-Knot Crystal Tear is a free pick in the north of Wheeping that you can consider as your second tear early on.
Phase 2: Fanning the Flames
This is the heaviest phase for item collection. Several critical pieces are clustered in and around Caelid, Altus Plateau, and Mt. Gelmir.
Flaming Strike Ash of War + Red-Hot Whetblade
Both items needed to fully set up your weapons are in the same location – treat this as one efficient stop, and do it before you access the Altus Plateau. This is important: once you reach Altus Plateau, Redmane Castle enters festival mode and the Red-Hot Whetblade becomes inaccessible until after defeating Starscourge Radahn and exhausting Castellan Jerren’s dialogue. Getting locked out means your weapons run without Flame Art for a significant stretch of the mid-game. Go to Redmane Castle first.
The Flaming Strike Ash of War is dropped by a Teardrop Scarab in a small graveyard on the south cliffside behind the castle. From the front gate, hug right along the cliff toward the ballista, past the vampire bats, and jump the small gap to reach it. The Red-Hot Whetblade is inside a small building just northwest of the Chamber Outside the Plaza Site of Grace. Once you have both, apply Flaming Strike to your Bandit’s Curved Sword at a Site of Grace with Flame Art selected. For the second sword, take a Lost Ash of War to Smithing Master Hewg at Roundtable Hold to duplicate the Ash of War.
Raptor’s Black Feathers
Sage’s Cave sits on the west side of the Altus Plateau. In an open cave area with a waterfall, jump to the left, hug the left wall, and roll into what appears to be a dead end to reveal two chests – one holds the Raptor’s Black Feathers, the other the Skeletal Mask. Equip the chest piece immediately. Its 10% jump attack bonus stacks multiplicatively with the Claw Talisman’s 15%, bringing the combined jump attack increase to approximately 27%.
Golden Vow
Found on a corpse inside the Corpse-Stench Shack in Mt. Gelmir, just before the broken bridge. Requires 25 Faith and 47 FP to cast. The incantation grants an aura buff that increases all damage dealt by 15% and decreases all damage received by 10%, lasting 80 seconds. Crucially, its damage boost stacks multiplicatively with Flame, Grant Me Strength – these two spells don’t simply add together, they multiply one another’s effect.
Fire Scorpion Charm
Worth noting upfront: this is Fort Laiedd (Mt. Gelmir), not Fort Gael (Caelid) – two separate locations that are easy to conflate. It’s found up the ramparts on a wooden platform to the west of Fort Laiedd. Equipping it raises fire damage by 12% but increases physical damage received by 10%. The fire damage bonus applies across everything – weapons, Ash of War hits, fire incantations. The physical damage penalty is real; your fourth talisman slot (covered in Phase 3) should account for it.
Flame-Shrouding Cracked Tear
Dropped by the Putrid Avatar at the Minor Erdtree in Caelid, east of the Smoldering Church. Mixed into your physick, it boosts fire damage by 20% for three minutes. Slot it in immediately and update your flask. You also get the Greenburst Crystal Tear for the defeat and can put it in your flask as well right away.
Erdtree Seal
Found on a corpse in a cell near the Omenkiller enemy in the town below the Prison Town Church Site of Grace in Volcano Manor. Requires 40 Faith to wield, so you may collect this before you can use it. Don’t feel pressured to swap immediately. The Finger Seal performs competitively up to around Faith 60, and the Erdtree Seal’s superior scaling only meaningfully pulls ahead once you’re pushing beyond that. From roughly Faith 60 onwards though, the Erdtree Seal is the stronger choice and worth upgrading with Somber Smithing Stones as you find them.
Phase 2 Flask
Flame-Shrouding Cracked Tear + Greenburst Crystal Tear. Fire damage up, faster stamina recovery to smooth out longer fights while you wait for openings.
Phase 3: Full Scorched Faithful
The Millicent Decision
The choice of what to do with Millicent is one of the more consequential build decisions in the game – not just because of which talisman you walk away with, but because of when you walk away with it. There are three realistic paths here, and the right one depends on where you are in your Elden Ring journey.
Path 1: Kill Millicent, single playthrough
Once Millicent appears at Windmill Village in Altus Plateau – after defeating the Godskin Apostle there – you can end her questline early and collect Millicent’s Prosthesis. Pair it with the Winged Sword Insignia, which drops from the Cleanrot Knight boss in Stillwater Cave in southern Liurnia and is obtainable well before Altus. Both talismans stack, and together they ramp up attack power across three tiers of successive hits. The combined peak is slightly lower than the Rotten Winged Sword Insignia’s maximum, and you’re spending two talisman slots rather than one, but you have a functioning successive-hit damage setup from the mid-game onwards, covering a large portion of the run. The +5 Dexterity from the Prosthesis is largely wasted on this Faith build, but the damage ramp is real.
The trade-off: two talisman slots for this combination means reconsidering the rest of your setup. With Claw Talisman and Fire Scorpion Charm as non-negotiables, the Dragoncrest Greatshield Talisman gets dropped – which leaves the Fire Scorpion Charm’s physical damage penalty unaddressed. Factor that into your armor choices if you go this route.
Path 2: Help Millicent, single playthrough
Follow her questline through to its conclusion at Elphael, Brace of the Haligtree, assist her in defeating her sisters, and you receive the Rotten Winged Sword Insignia, which raises attack power in tiers of 6%, 8%, and 13% with successive hits. Stronger ceiling, one talisman slot, leaves the Dragoncrest Greatshield in place. The catch is that Elphael is one of the last areas in the game – you’re carrying just the Claw Talisman for jump attack damage and no successive-hit synergy for most of the run. If you’re comfortable with that gap, this is the cleaner late-game setup.
Path 3: NG+ run
The optimal outcome, if you’re planning a second playthrough. Help Millicent in your first run and collect the Rotten Winged Sword Insignia. In NG+, kill her at Windmill Village for the Prosthesis. The two stack together, giving you the strongest possible successive-hit combination across both talisman slots without any of the single-playthrough compromises.
For a first run through the base game, Path 1 is more practical than it’s often given credit for. Path 2 is the stronger endgame setup on paper. Path 3 is the answer if you’re already thinking about NG+.
Dragoncrest Greatshield Talisman
Found in a chest on an elevated platform inside the large building in the northeast of Elphael, guarded by several Pests, reachable from the Drainage Channel Site of Grace. It reduces physical damage received by 20% – more than covering the Fire Scorpion Charm’s 10% penalty, with room to spare. This occupies your fourth talisman slot.
Thorny Cracked Tear
Dropped by the Putrid Avatar at the Minor Erdtree east of Ordina Liturgical Town in the Consecrated Snowfield. When active, it scales your attack power upward in tiers as you land successive hits, lasting three minutes. This replaces the Greenspill Tear in your physick. By this point in the game, your Vigor and combat experience should let you sustain through aggression rather than relying on additional health.
Final Physick
Flame-Shrouding Cracked Tear + Thorny Cracked Tear. Pop it at the fog gate. Everything is live.
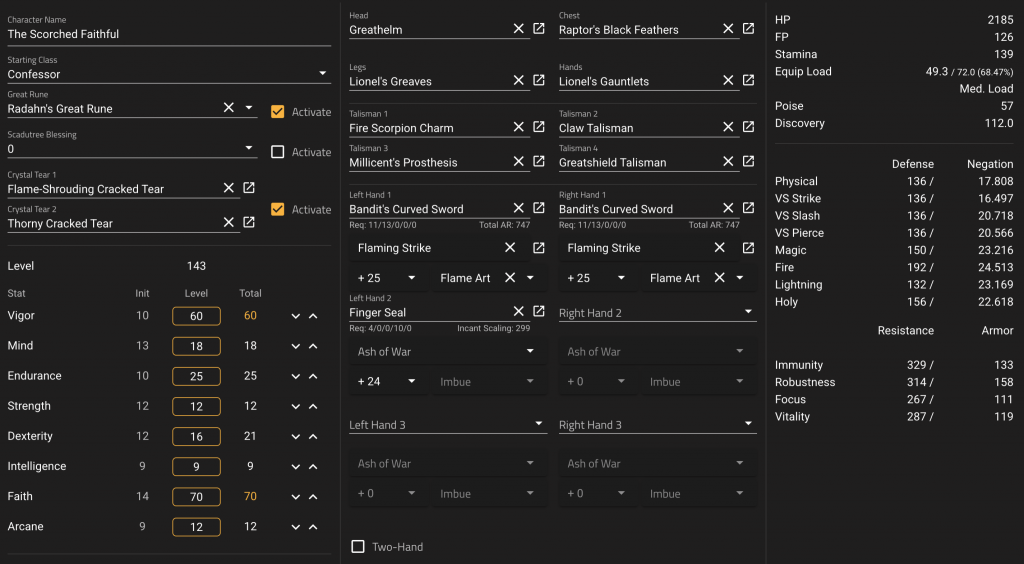
Build Distilled: Final Stat Distribution
The Pre-Boss Ritual
The order matters. Here’s the sequence:
- Pop your physick at the fog gate. Both tears last three minutes, so no rush.
- Cast Golden Vow. 80 seconds of duration – cast it a moment before stepping through.
- Cast Flame, Grant Me Strength immediately before entering. 30 seconds is shorter than it sounds when you’re managing menus.
- Set your blades on fire – at least the one in the off-hand to avoid fumbling around with the controller when you enter the boss arena.
- Enter. Jump. Keep hitting.
With the full stack active – physick fire boost (+20%), Flame, Grant Me Strength (+20% fire and physical), Golden Vow (+15% all damage), and Fire Scorpion Charm (+12% fire) – the multiplicative layering produces a damage window meaningfully larger than the individual numbers suggest. The Thorny Cracked Tear and Rotten Winged Sword Insignia then build further as the fight progresses and your hit count climbs.
The Scorched Faithful in Action
Just to show, that the build works already quite well at around level 100, I recoded the destruction of the Tree Sentinel in Crumbling Farum Azula.
From the Field: Real-World Variations
The build above is the targeted around level 150 endpoint. In practice, running the base game with this build reveals a few adjustments worth knowing about.
The Sacred Blade Swap
Some bosses in Elden Ring have notable resistance to fire damage (looking at you Fire Giant and you Mogh, Lord of Blood), which means your entire buff stack suddenly hitting a wall of resistance. The most elegant solution is keeping the Ash of War: Sacred Blade, which applies the Sacred affinity to your weapons (adding Holy damage and Faith scaling) ready to equip at a Site of Grace before those encounters. Your Faith investment carries cleanly into the Sacred affinity, keeping your weapon damage strong even after the swap. The Ash of War is found on a Teardrop Scarab north of the Third Church of Marika in Limgrave, next to a Spiritspring – one of the earliest items accessible in the game. It costs nothing to hold onto as a contingency. This is where the Faith investment really pays off nicely.
Scavenger’s Curved Sword (off-hand bleed option)
Found in Mt. Gelmir on a corpse near a Grafted Scion, across a stone pillar-bridge northwest of the First Mt. Gelmir Campsite Site of Grace and notably, only one is available per playthrough. Swapping it into the off-hand in place of the second Bandit’s Curved Sword adds innate Hemorrhage buildup to your attack pattern, opening up a second damage avenue on enemies susceptible to bleed. Put Flaming Strike in Flame Art on it as well for fire damage and passive blood buildup.
Rotten Breath (12 Arcane insurance policy)
Rotten Breath requires 15 Faith and 12 Arcane to cast – meaning a small investment of two or three points in Arcane (above the base starting value) unlocks the option. It’s purchased with one Dragon Heart at the Cathedral of Dragon Communion and coats a wide frontal area in Scarlet Rot buildup. You’ll rarely need it, but against the handful of bosses where stacking rot is a viable strategy, having it available costs very little. The Arcane investment doesn’t meaningfully boost the rot buildup itself on this build, it’s a pure utility unlock. It also allows you to use Dragonfire or Dragonice, if you want to.
A Note on the Level Ceiling
The full build is framed around level 150, but the base game is entirely clearable before that. Running this build through to the end of the Lands Between sits comfortably around level 100 when approaching Sir Gideon Ofnir, the All-Knowing – at least that’s what it was in my run.
The level 150 target gives you a polished, optimised endpoint to work toward, but don’t let it create the impression that anything before that is unplayable.
A Few More Notes From the Field
Aside from the field notes above and a few remarks scattered through the guide, this article stays focused on the build rather than my actual run. Covering the run in full would have stretched things well beyond reasonable reading length – but it would also have shown every place I deviated from the plan.
For example: I never picked up the Raptor’s Black Feathers. I ended up sticking with the Confessor Armor throughout, eventually pairing it with Lionel’s Gauntlets and Greaves and the Greathelm you can buy from the merchant in south Caelid. The 58 poise that combination provides is just one more than with the Black Feathers, but honestly I simply forgot to grab that piece of armor.

There’s also no routing guide here. No optimal path to the +1 Smithing Stones in Limgrave or the +2s in Liurnia (and so on), no walkthrough of when to use the teleport trap in the Dragon-Burnt Ruins to skip ahead to Caelid for Fort Faroth (with the right half of the Dectus Medallion and Radagon’s Soreseal). Four years on, you’ve probably got that side of things figured out. If you’d like a detailed breakdown of my setup plan though (which won’t differ dramatically from what’s already out there on YouTube) drop a note in the comments and I’ll put something together.
A Final Word
As I said at the start: this is a melee build. The Bandit’s Curved Swords are doing the heavy lifting, and everything else exists to make them hit as hard as possible. But if you’ve followed this guide to the end, you’re sitting at 70 Faith, and that number opens more doors than this build explicitly uses. Fire incantations, holy options, dragon communion spells, etc. – a huge chunk of the game’s offensive roster is now available to you without spending a single additional rune. Whether you keep the build pure or start experimenting with what else is in your spellbook, the foundation is solid either way. The Lands Between isn’t going to know what hit it – probably because it was on fire…
If you gave this build a try, I’d love to hear how it went. What worked? What did you change? What would you do differently? Drop a note in the comments below.
… and maybe you want to take a look at our other Build Guides as well.
Leave a Reply