
Welcome to a new series where we’ll be diving deep into Elden Ring’s most memorable regions – and I do mean deep. We’re kicking things off by venturing into the underground depths to explore one of the game’s most infamous locations.
That’s right, fellow Tarnished: we’re talking about the Lake of Rot. Because nothing says “welcome to the series” quite like drowning in crimson sludge that eats through your health bar faster than Malenia’s Waterfowl Dance.
Over the course of this series, we’ll be breaking down different areas throughout the Lands Between, covering everything from navigation tips to hidden loot, boss strategies to environmental storytelling. Some regions will be beautiful. Some will be haunting. This one? This one wants you dead.
So let’s grab our Preserving Boluses and wade into one of FromSoftware’s most notorious poison swamps. Time to get rotted…
Overture
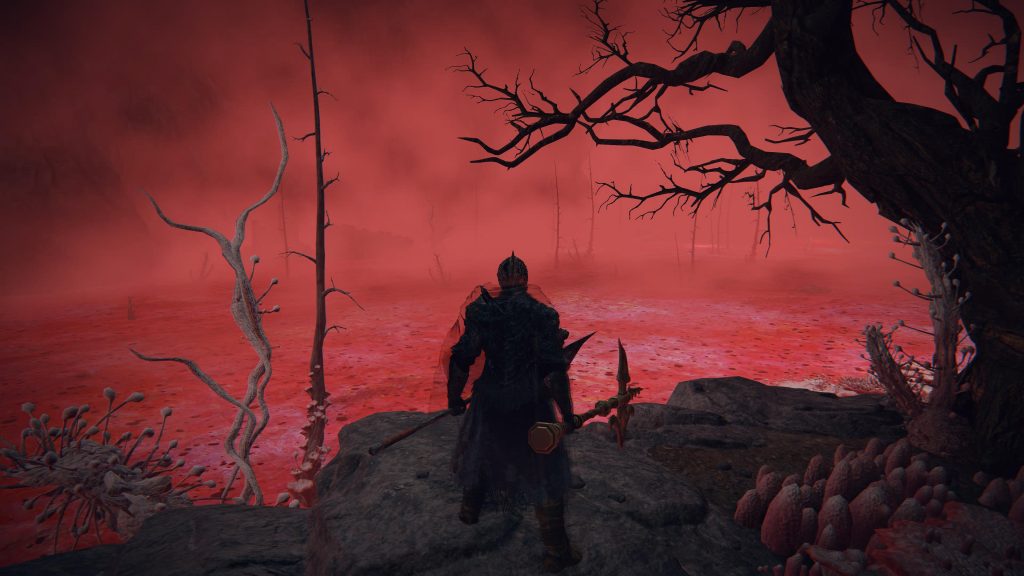
If you’ve been following Ranni the Witch’s questline in Elden Ring, congratulations – you’re about to experience one of FromSoftware’s most notorious traditions. The Lake of Rot awaits you, and it’s exactly as welcoming as the name suggests. This vast underground cavern filled with standing water will test your patience, your preparation, and your willingness to watch your health bar slowly drain while cursing Hidetaka Miyazaki’s name.
But here’s the good news: with the right approach, you can navigate this crimson nightmare without losing your sanity. Whether you’re a completionist hunting every Somber Smithing Stone or just trying to reach Astel to continue Ranni’s quest, this guide will help you survive the rot, defeat the optional bosses, and emerge victorious from one of the game’s most challenging areas.
How to Reach the Lake of Rot
Getting to the Lake of Rot requires substantial progress through Ranni’s questline. You’ll need to work your way through several underground areas before you even catch your first glimpse of those deadly crimson waters.
Your journey begins at Renna’s Rise in the Three Sisters area behind Caria Manor. After progressing through Ranni’s quest to a certain point, you’ll gain access to a teleporter at the top of this tower that warps you to Ainsel River Main. From there, you’ll need to navigate through the ethereal ruins of Nokstella, Eternal City – a sprawling underground metropolis lit by an artificial starry sky.
The path through Nokstella eventually leads to a confrontation with the Baleful Shadow, an aggressive red phantom that guards the way forward. Defeating this invader is mandatory for progression and rewards you with the Discarded Palace Key. Beyond the Shadow’s spawn point, you’ll find an elevator descending further into the depths.
Take that elevator down, and you’ll arrive at the Lake of Rot Shoreside Site of Grace. The recommended level for tackling this area ranges from 80 to 100, so if you’ve been following the natural progression path and exploring thoroughly, you should be adequately prepared for what lies ahead.
Understanding the Scarlet Rot Threat
The Lake of Rot isn’t just another poison swamp – it’s significantly more dangerous. The moment you step into those crimson waters, Scarlet Rot buildup begins accumulating at an alarming rate. We’re talking about three to five seconds before the status effect fully procs if you’re wearing standard armor without immunity bonuses.
Once Scarlet Rot activates, you’ll start taking continuous damage based on a percentage of your maximum health. The Lake of Rot’s version lasts for a brutal 180 seconds (three full minutes) and will absolutely kill you if left untreated. The damage formula is 2% of your max HP plus 30 damage per second – meaning at 1000 HP you’re losing 50 health every second, and at 2000 HP it’s 70 per second. This is significantly more punishing than weapon-applied Scarlet Rot.
What makes the Lake of Rot particularly brutal is that the rot buildup continues even after you leave the water if you’ve been rolling in it. The substance coats your character and keeps accumulating until you either cure it or let it proc. Rolling accelerates this process because it covers your entire body with the rot liquid, so sprinting is generally safer than panic-rolling through the shallows.
Essential Survival Gear and Consumables
Before you venture into the lake proper, you’ll want to gather specific items that dramatically improve your chances of survival. Here’s what you should prioritize:
Flame, Cleanse Me remains the gold standard for rot removal. This Fire Monk incantation only requires 12 Faith to cast and instantly removes Scarlet Rot buildup or cures an active infection. You can find it at the Fire Monk camp south of the Church of Vows in eastern Liurnia. If your build doesn’t have 12 Faith, consider using the Two Fingers Heirloom talisman to reach the requirement, or spend a few runes to level up. You’ll need any seal to cast it – the basic Finger Seal works fine and can be purchased from the Twin Maiden Husks in Roundtable Hold.
Preserving Boluses serve as your backup or primary option if you’re running a no-magic build. These consumables cure Scarlet Rot on use, though they’re more resource-intensive than the incantation. To craft them, you’ll need Armorer’s Cookbook [6], which is located in Siofra River near the Hallowhorn Grounds. The recipe requires Dewkissed Herba, Crystal Cave Moss, and Sacramental Bud. Stock up on at least 10-15 boluses if you’re relying on them exclusively.
Mushroom Armor Set provides the highest immunity stats in the game. The body, arm, and leg pieces are found in Seethewater Cave on Mt. Gelmir, in a cavern guarded by a Giant Miranda Sprout and several Servants of Rot. The Mushroom Crown helmet is actually located within the Lake of Rot itself, in the southeast corner – we’ll cover how to reach it later in this guide. While the armor’s physical defenses are laughable, that doesn’t matter here since most enemies don’t deal direct damage.
Immunizing Horn Charm increases your immunity by 90 points, giving you a larger buildup bar before rot procs. You can find the base version in an ant nest in the southwestern area of Ainsel River. The upgraded Immunizing Horn Charm +1, which grants 140 immunity, drops from a lonely Ancestral Follower wandering in the Lake of Rot itself – southeast of the Shoreside grace.
Beast-Repellent Torch is an underrated lifesaver. While it won’t help with the rot, it completely pacifies the Basilisks that lurk in the lake, preventing their Death Blight attacks from adding to your problems. You can grab this torch from various merchants, including the one in the Dragonbarrow cave.
The “Weak Rot” Self-Proc Strategy
Here’s a clever technique that experienced players use to make extended exploration runs through the lake: you can intentionally trigger a weaker version of Scarlet Rot that deals significantly less damage.
Here’s how it works: when you roll in the rot water, the substance coats your character and continues building up even after you exit. If you let the buildup meter fill while standing on dry land rather than while submerged, you’ll proc a considerably weaker variant of Scarlet Rot.
To execute this strategy, temporarily unequip your armor to reduce your immunity – this makes the buildup happen faster. Roll repeatedly in the shallow rot near the starting shore until your buildup meter reaches about 75%. Then sprint back to the safety of the stone platform and wait for the residue to finish filling the meter.
The resulting Scarlet Rot deals notably less damage per tick compared to the full-strength version. While it still outdamages most regeneration setups, you can combine it with healing buffs like Blessing of the Erdtree, the Blessed Dew Talisman, and the Icon Shield to partially offset the damage. This allows you to make much longer exploration runs without constantly curing yourself or chugging flasks.
Is it a bit exploitative? Maybe. Will Miyazaki judge you for using it? Probably. Does it work beautifully? Absolutely.
Navigating the Platform Puzzle
The Lake of Rot features a clever environmental puzzle that creates safe pathways through the rot. Scattered across the lake are four stone obelisks with pressure plates at their bases. Activating these plates raises platforms from beneath the crimson waters, giving you solid ground to stand on while planning your next move.
Start from the Shoreside grace and look southwest. The first obelisk should be visible in the distance. Sprint through the shallow rot to reach it and activate the plate. This raises a series of platforms leading further into the lake.
The second obelisk sits south of the first, easily reachable via the newly raised platforms. Hit its pressure plate to extend the path even further.
For the third obelisk, you’ll need to head southeast from the second one. Jump onto the platform directly east, then aim for a large central platform with a broken pillar base – this landmark serves as a useful reference point for navigation. The third obelisk is located just southwest of this central area.
The fourth obelisk sits further southwest, closer to the massive structure in the distance. Activating this final plate completes the main pathway leading to the Grand Cloister.
There’s a fifth pressure plate on the eastern side of the lake, near where the Dragonkin Soldier lurks. This one creates platforms around the boss arena, allowing you to fight without constantly standing in rot. We’ll discuss that encounter in detail shortly.
Before you start your platform hunt, grab the Map (Lake of Rot) from a corpse right by the water’s edge near the Shoreside grace. Having the full map revealed makes navigation considerably easier.
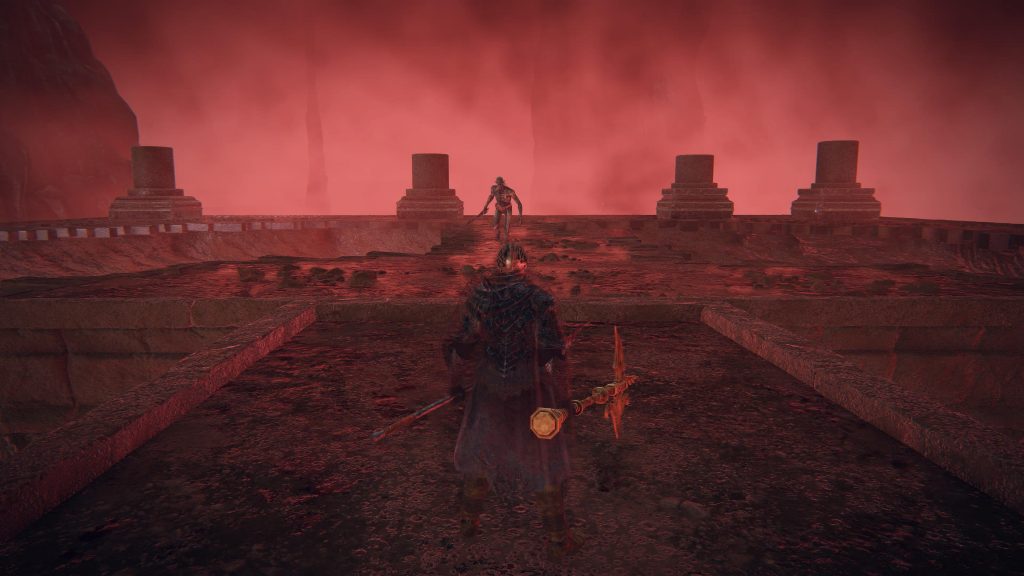
Enemy Encounters in the Lake
The Lake of Rot is relatively sparse when it comes to enemy encounters, which is a small mercy given the environmental hazard you’re already dealing with.
Basilisks are your primary nuisance. These bug-eyed creatures emerge from the rot waters and attempt to blast you with Death Blight mist. The good news is that Death Blight doesn’t deal direct damage – it simply insta-kills you when the buildup bar fills. The better news is that equipping the Beast-Repellent Torch completely neutralizes them as a threat. They won’t aggro unless you attack first, turning them from dangerous foes into harmless scenery.
An Ancestral Follower wanders the southeastern portion of the lake, seemingly unbothered by the rot around him. This enemy is your ticket to obtaining the Immunizing Horn Charm +1. You can engage him directly in the rot, but ranged attacks from the nearby platforms are safer. After defeating him, you’ll need to wade into the rot briefly to loot the talisman from his corpse. Use Flame, Cleanse Me immediately after grabbing it, or teleport back to the Shoreside grace to remove the rot automatically.
The Alabaster Lord appears on an elevated platform after you’ve activated the fourth obelisk. This semi-optional miniboss guards a Somber Smithing Stone [9] and drops the Alabaster Lord’s Sword upon defeat. The fight takes place on narrow scaffolding, so falling is actually more dangerous than his attacks. Take your time, watch your footing, and prioritize staying on the platform over dealing damage.
Optional Boss: Dragonkin Soldier
In the eastern section of the lake, you’ll find a Dragonkin Soldier slumped in the rot waters – another of those corrupted dragons wrapped in decaying flesh. This encounter is completely optional but rewards you with the Dragonscale Blade, a useful strength/dexterity weapon with innate lightning damage.
Before engaging this boss, locate the pressure plate on a pillar east of its position. Activating this plate raises four large platforms around the Dragonkin Soldier’s arena, giving you solid ground for the fight. Without these platforms, you’ll be fighting while constantly accumulating rot buildup, which transforms a manageable encounter into a miserable slog.
The Dragonkin Soldier fights identically to the version you may have encountered in Siofra River. It primarily attacks with wide arm sweeps, ground slams, and lunging grabs. Stay near its right leg and bait out its predictable attack patterns. When it sweeps with its right arm from front to back, roll toward the boss rather than away – this positions you for easy counterattacks on its leg.
During the second phase, the Dragonkin Soldier gains ice-based attacks, including a massive frost breath that covers a wide area. Watch for the telltale head-rearing animation and sprint to the side platforms if needed. The platform layout gives you plenty of room to maneuver, so use the full arena rather than staying in one spot.
Ranged builds have a significant advantage here. You can maintain distance while peppering the boss with spells or arrows, avoiding most of its attacks entirely. The Dragonkin Soldier moves slowly and telegraphs its attacks clearly, making it vulnerable to patient, long-range tactics.
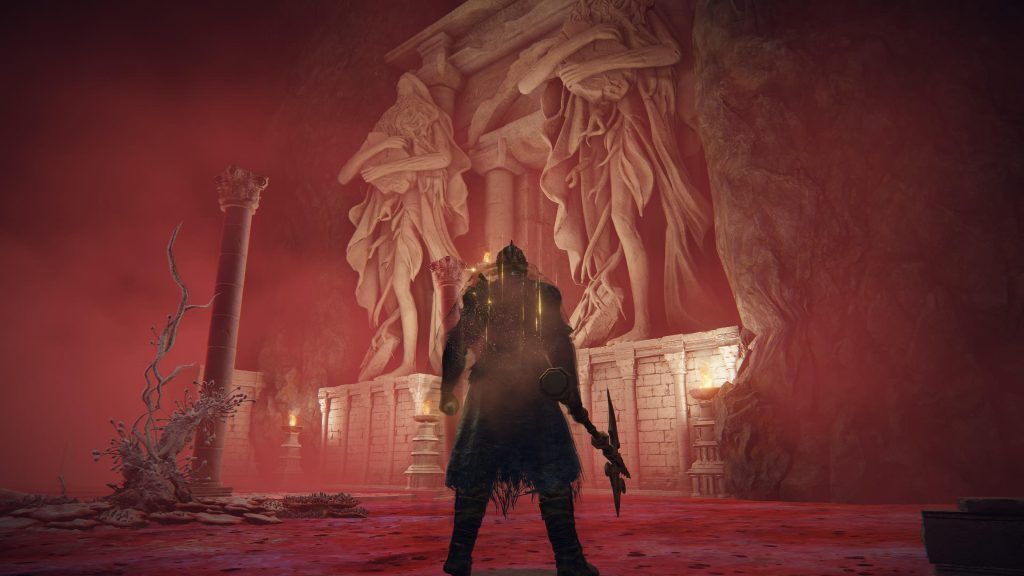
Descending to the Grand Cloister
After activating the main platform sequence, continue south toward the imposing temple structure. Stairs lead down to the Grand Cloister, a multi-tiered complex overrun with enemies and hiding some valuable loot.
The Grand Cloister Site of Grace is located on the first level you reach. Rest here before exploring further – you’ll want full resources for what’s ahead.
Kindred of Rot enemies populate the cloister in significant numbers. These insectoid creatures wield deadly magic attacks called Pest Threads that fire seeking projectiles. Fighting them one-on-one is manageable, but pulling multiple simultaneously can quickly overwhelm you with overlapping spellfire. Use the stone pillars for cover and pick them off individually.
These enemies drop the Pest’s Glaive weapon, which scales well with elemental infusions if you’re interested in collecting it.
A small stream of Scarlet Rot runs through the cloister, though it’s easily avoided with careful movement. More dangerous is the hidden ambush waiting near the northern waterfall. As you approach the area with two corpses (holding Smithing Stone [6] and Smithing Stone [7]), an Putrid Tree Spirit bursts from the rot water.
This serpentine abomination is just as aggressive and flail-y as other Tree Spirits you’ve encountered. The good news is that you have access to spirit summons in this area. Use a tanky ash like the Mimic Tear or Banished Knight Oleg to divide its attention. The Tree Spirit drops a Golden Seed upon defeat – valuable for upgrading your flask capacity.
West of the cloister entrance sits a small temple structure with Kindred of Rot performing what appears to be worship near a large statue. Inside the temple, you’ll find a chest containing the Scorpion’s Stinger, a unique dagger that inflicts Scarlet Rot buildup. This is one of the few weapons capable of applying rot to enemies, making it worth grabbing even if you don’t plan to use it.
In the southwestern ruins, a chest holds Nomadic Warrior’s Cookbook [22], which unlocks crafting recipes for Rot Pots and various Rot Greases. These items are situational but can be useful for rot-themed builds or applying the status effect to certain bosses.
Reaching Astel, Naturalborn of the Void
At the western edge of the Grand Cloister, you’ll find a waterfall of rot cascading down. Navigate the ledges carefully to reach the bottom floor, where several coffins sit in the rot stream. One coffin – located at the southwesternmost point – is interactive.
Enter this coffin to trigger a cutscene. You’ll be transported to an isolated arena far south of the Lake of Rot proper, accessible only through this specific coffin. Through the fog gate ahead waits Astel, Naturalborn of the Void.
Astel is a mandatory boss for completing Ranni’s questline. This cosmic horror resembles a massive insectoid creature with a skull-like head and segmented tail. The fight takes place in a vast arena with no environmental hazards – a welcome change after all that rot.
Defeating Astel requires learning his attack patterns, which include gravity magic, cosmic beam attacks, and devastating grab attempts. His tail slam attack covers a wide area, and his teleportation ability can catch you off guard. Stay mobile, watch for his tells, and don’t get greedy with your attacks when he starts channeling his powerful cosmic abilities.
Victory rewards you with 80,000 runes and the Remembrance of the Naturalborn. You can trade this remembrance with Enia at Roundtable Hold for either Ash of War: Waves of Darkness or the Bastard’s Stars flail weapon.
After defeating Astel, activate the Site of Grace in his arena. Head north through the passage beyond his room to find an elevator. This lift takes you back to the surface at the Deep Ainsel Well – but only if you have the Dark Moon Ring in your inventory. If you don’t have this key item yet, the passage will be sealed.
Assuming you have the ring, the elevator grants access to the Moonlight Altar in Liurnia, the final destination in Ranni’s questline.
Collectibles and Notable Loot
The Lake of Rot hides numerous valuable items for those willing to brave the rot thoroughly. Here’s a rundown of the most important collectibles:
Somber Smithing Stones are scattered throughout the area. You’ll find a [6] near the eastern shore, a [7] on the platforms, an [8] southeast of the Dragonkin Soldier, and a [9] on the elevated platform where the Alabaster Lord appears. These high-level upgrade materials are crucial for bringing unique weapons to maximum power.
The Mushroom Crown sits on a corpse dangling from a pillar in the southeastern ruins. To reach it, you’ll need to ascend a ramp along the cavern walls, then carefully jump across the crumbling architecture. The helmet provides the same excellent immunity stats as the rest of the Mushroom Set.
Immunizing Horn Charm +1 drops from the Ancestral Follower wandering the southeastern lake. This upgraded talisman is one of the best tools for resisting status effects throughout the game, not just in rot areas.
Dragonscale Blade is your reward for defeating the Dragonkin Soldier. This heavy thrusting sword deals physical and lightning damage, making it effective against enemies weak to either damage type.
Alabaster Lord’s Sword drops from the Alabaster Lord miniboss. This curved greatsword has unique gravity magic properties and can be a powerful weapon for strength/intelligence hybrid builds.
Various Golden Runes ranging from [7] to [10] are scattered on corpses throughout the cloister. These provide significant rune infusions if you need levels or purchasing power.
Warming Stones and Aeonian Butterflies can be found in small quantities, useful for crafting if your build requires them.
Lore: The Sealed Outer God
The Lake of Rot isn’t just an environmental challenge – it’s steeped in significant lore connections to Elden Ring’s broader narrative. According to in-game descriptions and item texts, the divine essence of an Outer God is sealed within this lake.
This isn’t just any Outer God, but specifically the god of Scarlet Rot – the same cosmic entity whose power infected Malenia and transformed her into the rot goddess we encounter in Caelid. Long ago, this entity manifested as a massive scorpion and held considerable influence over the Lands Between.
A blind swordsman who moved like flowing water defeated this god in combat and sealed its essence beneath the earth. The Ainsel and Siofra rivers were supposedly diverted to flow over the sealed location, containing the rot’s spread. This explains why the Lake of Rot sits at the downstream terminus of the Ainsel River.
The ruins you navigate through belong to an ancient dynasty that predates the current era of the Golden Order. The Grand Cloister served as a temple complex where the Servants of Rot worshipped their sealed god. The Kindred of Rot enemies are descendants or followers of this rot worship, and the Scorpion’s Stinger dagger represents a sacred relic crafted from their god’s remains.
This lore connects directly to Malenia’s storyline. The same blind swordsman who sealed the Outer God later trained Malenia, teaching her techniques to suppress the rot within her own body. The Scorpion’s Stinger and other rot-themed items scattered throughout the lake represent remnants of ancient rot worship that predates even Malenia’s birth.
Final Tips for Success
Surviving the Lake of Rot comes down to preparation and patience. Allocate your flasks heavily toward health recovery rather than FP unless you’re using Flame, Cleanse Me as your primary rot removal method. In that case, keep 2-3 Flasks of Cerulean Tears available for emergency cleansing.
Don’t rush. The platforms provide safe zones where rot buildup fades over time. Use these rest points to assess your next move, apply buffs, or simply wait for your buildup to reset completely. Sprinting blindly from point to point gets you killed – strategic pauses keep you alive.
If you’re struggling with resource management, remember that you can teleport back to the Shoreside grace at any time. Teleporting instantly removes active Scarlet Rot, protecting your runes and giving you a chance to restock. The area isn’t so large that multiple trips feel tedious.
Equip your lightest armor if you’re confident in your rot management. The slight increase in movement speed helps, and the physical defense from heavy armor doesn’t matter much here since most threats are environmental.
Finally, don’t skip the Beast-Repellent Torch. Dealing with Basilisk Death Blight on top of Scarlet Rot management is an unnecessary headache. The torch turns them into harmless statues and makes navigation dramatically smoother.
What Comes Next
After conquering the Lake of Rot and defeating Astel, you’ll gain access to the Moonlight Altar in Liurnia – assuming you have the Dark Moon Ring. This elevated plateau is where Ranni’s questline reaches its conclusion, leading to one of Elden Ring’s alternate endings.
The Moonlight Altar also contains the Cathedral of Manus Celes, where you’ll give Ranni the ring and complete her questline. This action unlocks the Age of Stars ending option at the game’s conclusion.
Even if you’re not following Ranni’s quest, the Lake of Rot contains enough valuable upgrade materials and unique weapons to justify the suffering. Those Somber Smithing Stones can’t be found anywhere else at these levels, and weapons like the Dragonscale Blade and Alabaster Lord’s Sword offer distinctive playstyle options.
Fellow Tarnished, the Lake of Rot stands as one of FromSoftware’s most challenging environmental hazards, but it’s absolutely conquerable with the right preparation. Stock up on Preserving Boluses, equip Flame Cleanse Me, throw on that ridiculous Mushroom armor, and venture into the crimson depths. The path to Astel—and to Ranni’s ending—lies beyond those rotting waters.
Yes, you’ll die a few times. Yes, you’ll curse Miyazaki’s name. But when you finally stand victorious in Astel’s arena with the Remembrance of the Naturalborn in hand, all those deaths in the rot will have been worth it. Now get down there and show that Outer God who’s boss.
… and don’t forget to check out our other Elden Ring Guides & Tips as well.
Leave a Reply