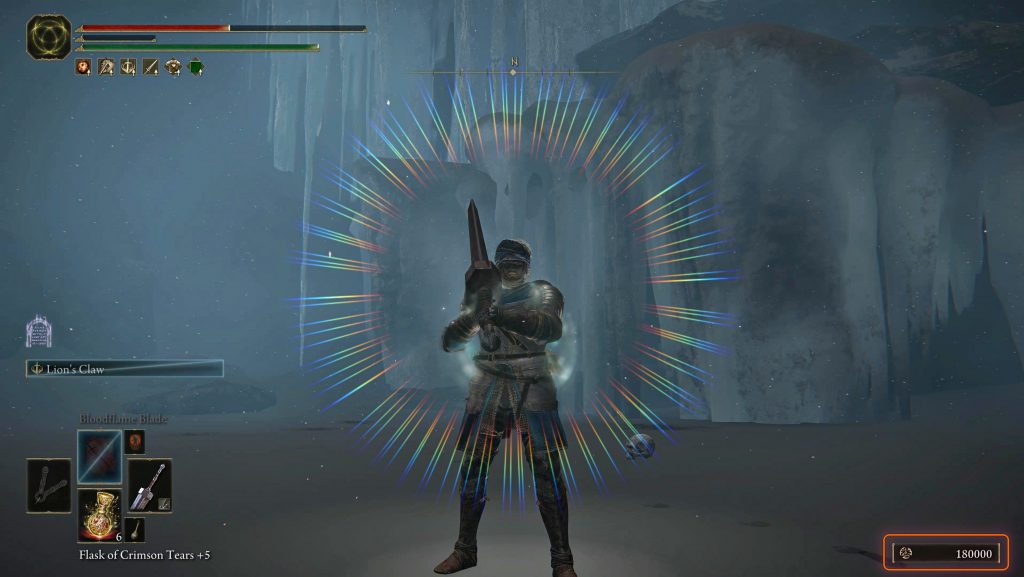
A couple of weeks ago, I introduced the Magma Hunter Challenge, where you must defeat all Magma Wyrms in the base game. Who would I be to send you into this painful joy (or joyful pain) without conquering the challenge myself? Take a seat and read my “travel report” as inspiration for your own run.

I have to admit the challenge took me longer than expected, but it was incredibly rewarding. Beyond defeating all the Magma Wyrms in the base game (including Great Wyrm Theodorix), you must also overcome two Shardbearers, the notorious Draconic Tree Sentinel, Morgott the Omen King and Commander Niall—not to mention hours of Torrenting across the Lands Between from Limgrave to the Consecrated Snowfield.
Choosing the Weapon
As you surely know from our post “The Magma Hunter Challenge” you must complete this challenge using only a single weapon obtained in Caelid. I chose to go with the Greatsword, a Colossal Sword that you can snatch from a carriage in Caelid’s Dragonbarrow region (watch out for those dogs!).
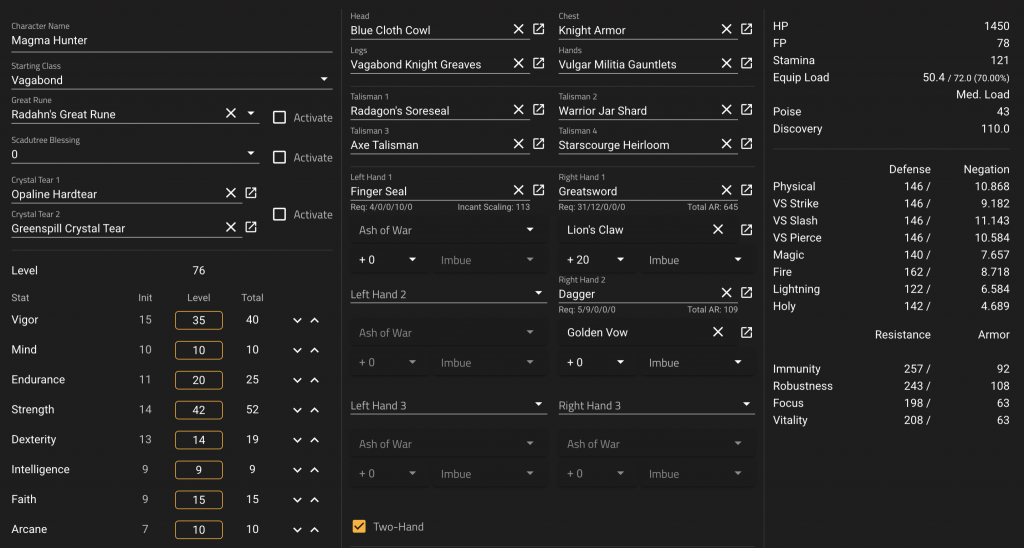
The weapon sets the tone for the journey as it requires normal smithing stones for upgrading and primarily scales with Strength. No complex stat distributions here. Strength and Vigor became my priority, with some investment in Endurance to handle the weapon’s truck-like weight.
Based on the weapon requirements, I carefully selected my starter class. It came down to “Hero” or “Vagabond,” as they offer the highest base strength. I ultimately chose “Vagabond” for the “Vagabond Knight Set,” which provides decent damage negation and 46 poise from the start. My strategy was to use the Greatsword with a Standard affinity, focusing on maximizing its physical damage output. The Standard affinity makes the Greatsword scale primarily with Strength, but also provides some benefit from Dexterity.
And so the journey began…
The Early Game Setup
After a quick visit to Kalé, I headed to the “Seaside Ruins” site of grace, received Torrent, and continued to the “Dragon-Burnt Ruins” to use the teleporter chest to reach “Sellia Crystal Tunnel”—a routine shortcut in most of my runs. After escaping the tunnel, I performed half the Sellia skip to reach the “Church of the Plague,” grabbing grace and a Sacred Tear before heading north to the spirit spring.
From there, I jumped onto the cauliflower-shaped rock to collect smithing stones and a stonesword key. Next stop: “Fort Faroth” where I collected “Radagon’s Soreseal” to make two hand wielding the sword possible (31 strength requirement). I then continued to the “Lenne’s Rise” site of grace and cheesed the Night’s Cavalry on the bridge for 40K runes to prepare for my weapon acquisition.
I still didn’t need a weapon, therefore I transported back to “Seaside Ruins” and ventured to the Weeping Peninsula for Sacred Tears and Golden Seeds. Then on to Mistwoods to collect the Axe Talisman from “Mistwood Ruins,” along with “Spiked Cracked Tear” and “Greenspill Crystal Tear.” I continued to the “Third Church of Marika” for the Flask of Wondrous Physick, “Crimson Crystal Tear”, and another Sacred Tear. Next stop: “Stormhill” for “Golden Vow” and “Strength-Knot Crystal Tear,” plus some Smithing Stone 1 collection and runes.
Okay, I’m afraid this post is turning into a novel with all this detail. Let’s pull back and take a broader perspective for faster progress…
Acquiring and Upgrading the Greatsword
Finally, it was time to get the Greatsword. I traveled to the “Caelem Ruins” site of grace, acquired the weapon, applied “Determination” to it, and upgraded it to +3. I continued my setup with the Stormveil skip to Liurnia, where I used the teleporter to the “South Raya Lucaria Gate,” collected the “Bloodflame Blade” ash of war, and progressed to the “Raya Lucaria Crystal Tunnel.” After defeating the Crystalian, I obtained the Smithing-Stone Miner’s Bell Bearing (1) and upgraded the weapon to +6.
With two more tasks on my list, I torrented to “Ruin-Strewn Precipice” and secured the “Ravine-Veiled Village” grace. Finally, I returned to “Caelem Ruins” and proceeded to “Fort Gael,” where I picked up “Flame Grant Me Strength” and defeated the Lion Guardian for the “Lion’s Claw” ash of war.
Taking Down the Shardbearers
After this extensive setup phase, I was ready for Stormveil Castle. With “Lion’s Claw” on my Greatsword, neither Margit nor Godrick posed much of a threat, and I soon had my first Shardbearer down. From the “South Raya Lucaria Gate,” I made my way into the Academy and defeated the Red Wolf of Radagon, followed by Renalla, Queen of the Full Moon. Two Shardbearers down, and plenty of runes invested in Strength and Vigor.
The Magma Wyrm Hunt Begins
Time for the first wyrm. I decided to tackle Magma Wyrm Makar, fought through “Ruin-Strewn Precipice,” and emerged victorious. This granted me access to Altus Plateau. From the “Abandoned Coffin” grace, I proceeded past “Erdtree-Gazing Hill” to the “Altus Plateau” grace and onward to “Outer Wall Phantom Tree,” collecting Sacred Tears, Golden Seeds, and map fragments along the way.
For further weapon upgrades, I entered the “Sealed Tunnel” and grabbed the Smithing-Stone Miner’s Bell Bearing (2) near the entrance without much combat. This allowed me to upgrade my weapon to +12. I continued through the capital outskirts and reached the “Hermit Merchant’s Shack” grace.
Ready for the second wyrm, I returned to “Caelem Ruins” and progressed to “Gael Tunnel,” where I defeated the boss with relative ease thanks to my upgraded weapon.
The Capital and Mt. Gelmir
Back at the “Hermit Merchant’s Shack” grace, I proceeded to face the notorious “Draconic Tree Sentinel” guarding Leyndell’s gate. I really should learn how to cheese this enemy someday, but instead endured the full fight until finally entering the capital and reaching the “Capital Rampart” grace.
For the third wyrm, I rode from “Erdtree-Gazing Hill” to “Fort Laiedd” and secured the “Seethewater Terminus” grace. This wyrm has around 12,200 HP—a significant increase from the 7,100 HP of the first two—but with patience and Torrent’s mobility, I defeated it.
The fourth wyrm awaited in Volcano Manor. I transported to the “Schoolhouse Classroom” grace in Raya Lucaria, went outside, and used the waterwheel to reach the Abductor Virgin in the basement, which transported me directly to Volcano Manor after it grabbed and killed me. After dropping down to the lava-surrounded houses, I took the elevator down to face wyrm number four. The limited space and surrounding lava made this fight challenging, but “Lion’s Claw” helped stagger the beast and secure critical hits. Like its “Fort Laiedd” counterpart, this wyrm has around 12,200 HP, but I prevailed.
In the end only one wyrm was left, but to reach the Great Wyrm Theodorix in the Consecrated Snowfield there was quite some work to do first…
Capital Business
Back at the “Capital Rampart” grace I fought my way through Leyndell and defeated Godfrey, First Elden Lord (Golden Shade) – one boss done, one to go. I progressed to Morgott, the Omen King and got kicked in my back – maybe because I had totally forgotten about Margit’s Shackle and also didn’t remember it later on.
After some leveling by defeating the Erdtree Avatar in Leyndell for a total of 60K runes and collecting some smithing stones 5, I gave it another try. The motto for the fight was “Hit hard, trade damage, die together – but be the last one standing” – see for yourself:
With the “Rold Medallion” from Melina, I reached the Mountaintops of the Giants and torrented directly to Castle Sol to obtain the left half of the Haligtree Secret Medallion. This meant defeating Commander Niall and his two Banished Knights (you may want to charm one of the Knights with a Bewitching Branch for an easier phase one fight – guess who didn’t…). After some attempts, Niall fell to my L2-spamming “Lion’s Claw” strategy, even though I completely lost enemy lock and camera focus at the start. Victory was within my grasp.
The Final Challenge: Great Wyrm Theodorix
After collecting the medallion’s left half, I traveled to the Grand Lift of Rold, realized I was missing the right half, and made a quick detour to the Village of the Albinaurics. Problem solved, I could finally enter the Consecrated Snowfield for the final challenge.
The Great Wyrm Theodorix boasts a whopping 25,649 HP, but having invested runes in Faith and Arcane, I could use Golden Vow, Flame Grant Me Strength and Bloodflame Blade on me and my trusty +20 Greatsword. After staggering him twice in his first phase, he rose to his hind legs, and I used Torrent to lure him close to a nearby Giant Land Octopus. This unexpected ally helped stagger Theodorix again, allowing me to finally conquer him.
Challenge complete! I hereby proclaim myself “Magma Hunter”.

Build Information
So, here’s what my build looked like when I finally took on the Great Wyrm Theodorix! This includes all my stats, reflecting what I’d built up to that point.

Final Thoughts
As you’ve seen, while this challenge doesn’t require defeating Elden Ring’s most difficult bosses, it remains challenging and tremendously satisfying. You’ll cover vast distances, battle formidable enemies and develop thoughtful character-building strategies. My routing certainly isn’t optimized and experienced players may need fewer upgrades and find more efficient approaches.
You might want to explore how to customize your experience by experimenting with the challenge variations I introduced in my earlier article, to make your run easier or more difficult. I’d love to hear how you tackled the challenge and what strategies you developed—feel free to share your insights!
Until next time. May your swords be sharp and your rolls precise!

Leave a Reply