
Welcome, fellow Tarnished! So you’ve heard whispers in the community that there’s a tutorial boss in Elden Ring Nightreign that you’re “supposed” to lose against, and naturally, your FromSoftware-trained brain is screaming “CHALLENGE ACCEPTED!”.
You’re absolutely right to feel that way, because not only can you beat this supposedly unbeatable tutorial boss, but there’s a unique relic waiting for you as a reward.
Let me tell you right now: the boss you’ll be facing is Margit, the Fell Omen (yes, our old “friend” from the base game), and he’s here to welcome you to Nightreign in the most FromSoft way possible. But we’re not backing down, are we?
Before You Begin: How to Access the Fight
If you’ve already blown through the tutorial like I did the first time (no shame there!), don’t worry. You can replay the tutorial anytime by going to the Visual Codex in Roundtable Hold – that’s the book on the desk north of the jar merchant. Here’s the step-by-step:
- Hit Select, go to Visual Codex, select Guide
- Look for “Basic Rules: Play Tutorial” – it should be highlighted by default
- Press X (Square on PlayStation) to start
Fair warning: you’ll always start as a low-level Wylder for this fight, regardless of your progress in the main game. No bringing your endgame gear to this party!
The Golden Rule: Clear Everything First
This is absolutely crucial. If you kill all the enemies and open all chests on the fairly linear path to the boss, you’ll be able to hit level 6, have a pretty decent build, and get two guaranteed uses of Wylder’s ultimate. This isn’t optional if you want to win – it’s mandatory.
Why this matters: Having your ultimate loaded before the fight is a game-changer. You’ll need that burst damage and the iframe protection it provides.
Your Arsenal: The Weapons That Matter
The tutorial provides you with several weapon options if you clear all enemies and open all chests.
The Complete Weapon Selection
Here’s the complete arsenal available:
| Weapon Name | Weapon Skill | Passive |
|---|---|---|
| Wylder’s Greatsword | Stamp (Upward Cut) | none |
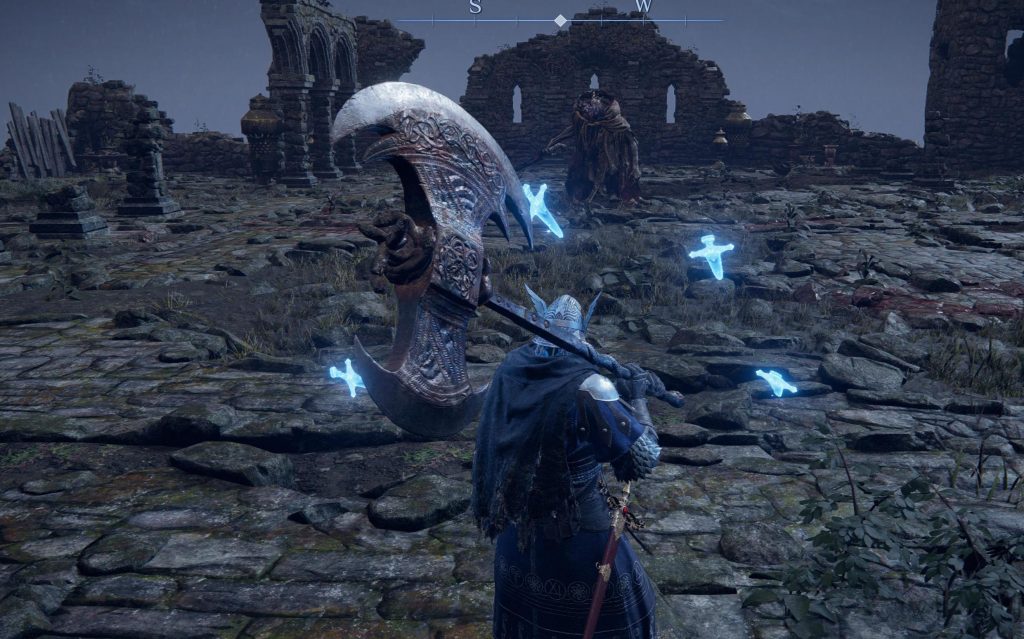
| Duelist Greataxe | Earthshaker | Improved Charge Attacks (+6%) |
| Cold Katar | Hoarfrost Stomp | Improved Jump Attacks (+6%) |
| Rogier’s Rapier | Repeating Thrust | Multiple Periodical Glintblades |
| Lordsworn’s Fire Straight Sword | Flaming Strike | Defeating Enemies Restores HP (+30) |
For your off-hand weapon, Rogier’s Rapier is the clear winner. Your main weapon choice comes down to personal preference and playstyle: the Cold Katar excels at frostbite buildup for percentage-based damage, while the Duelist Greataxe delivers raw power and superior stagger potential.
Rapier in Off-Hand: Your Passive Damage Engine
Equip Rogier’s Rapier in your off-hand. The rapier automatically summons Glintblades (those floating magic daggers that auto-target enemies) every few seconds through its Multiple Periodical Glintblades passive. The beauty of this setup is that these glintblades work even when you two-hand your main weapon!
Main Weapon Options: Power vs. Consistency
While the Cold Katar is an excellent choice with its frostbite capabilities and the weapon skill Hoarfrost Stomp, many players also find success switching to the Duelist Greataxe for its superior damage output and stagger potential – at least that’s what worked for me. The Duelist Greataxe hits harder and can break Margit’s poise more effectively, which becomes crucial especially if you lose your AI companion.
The Battle Plan: How to Actually Win
Phase 1: Positioning and Patience
When you enter the arena, Margit falls on the runic symbol that spawns on the ground. As soon as the symbol spawns, quickly dash or dodge away from it. In most cases, the boss will target the AI companion (the Duchess) first, allowing you to attack the Fell Omen from behind.
Phase 2: The Opening Gambit
The first thing you should do is get as close as you can and use Wylder’s ultimate skill to stagger the boss. This is your moment to shine – those iframes will keep you safe, and the damage output is substantial.
Phase 3: Support Your Ally
Here’s where that Warming Stone becomes crucial. After dealing a devastating blow, try to position the Warming Stone as close to your ally engaging Margit as you can to heal its HP. The AI companion is surprisingly helpful if you keep them alive, so don’t neglect this step.
Phase 4: Hit and Run Tactics
Keep your distance and attack only after the boss uses hammer attacks, letting the Continual Glintblades deal consistent damage. Your two-handed Great Axe will deliver devastating blows when you find safe openings, while the rapier’s glintblades provide constant pressure.
The Revival Dilemma
Reviving your AI teammate can be difficult and risky. If your AI companion gets defeated, do not immediately try to revive it, as it’ll take a lot of hits, and Margit will quickly close the gap between you and it. However, if the Duchess dies, you can use Wylder’s Ultimate Art to bring her back instantly – but only if you have another ultimate charge ready.
When Things Go Wrong: The Death Recovery
Don’t panic if you die – there’s a failsafe! You can revive once before the tutorial ends, and your souls are outside the boss room – you can run back to the grace and level back up before fighting again. However, Margit will have the amount of HP you left him with, but Duchess will not be there to help you anymore.
This is where the Duelist Greataxe’s higher damage and stagger potential really shines. Without the Duchess, you’ll need every advantage you can get in terms of raw damage output.
Your Reward: Was It Worth It?
After all that effort, what do you get? The relic is called Fell Omen Fetish, and it grants the following buffs: Boosts attack power while switching weapons. Increases throwing knife damage. It also increases Vigor by 1.
Is it game-breaking? Not really. The Fell Omen Fetish is more interesting than genuinely useful, but it’s a pretty good option until you unlock some of the really strong relics. The weapon swap damage bonus is actually quite handy for early game buildcrafting.
However, the real appeal is the combination of personal achievement, practical learning experience, and that classic Souls player mentality of “if it can be beaten, I’m going to beat it!”.
Final Tips for Success
- Be aggressive early, patient later – You can take more risks while the Duchess is alive to revive you. Once she’s down, let the glintblades do work while you play it safe.
- Support your AI companion – Use the Warming Stone to keep the Duchess alive as long as possible.
- Two-hand your main weapon – Keep the rapier equipped in your off-hand for the glintblades, but two-hand your Great Axe for maximum damage output.
- Don’t get greedy – Take your hits when Margit commits to his slower hammer attacks.
Remember, in grand FromSoftware tradition, this is a fight you’re supposed to lose, but it’s perfectly possible to gut it out and beat him anyway. You’ve got the tools, you’ve got the strategy, and most importantly, you’ve got that stubborn Tarnished spirit that refuses to accept “impossible”.
Now get out there and show Margit that tutorials are just suggestions! May your blade stay sharp and your dodges stay clean, fellow Elden Lord.
… and as always, don’t forget to check out our other Elden Ring Nightreign articles as well.
Leave a Reply