
Today, we’re unleashing two builds that’ll have you cackling with glee as you paint The Lands Between red. First up, we’re revisiting an old favorite with some new tricks up its sleeve – the Arcane Bleed Build. Trust me, it’s gotten even more ridiculous in the DLC. But wait, there’s more! We’re also introducing a Flowerstone Gavel Lightning Build, which will have your enemies crumbling faster than Godrick’s defenses against a maxed-out Comet Azur.

So grab your favorite bleed-inducing weapon, slather on some lightning, and let’s turn this DLC into a beautiful, chaotic mess. It’s time to make Mohg proud and channel your inner Malenia as we explore these delightfully devastating builds!
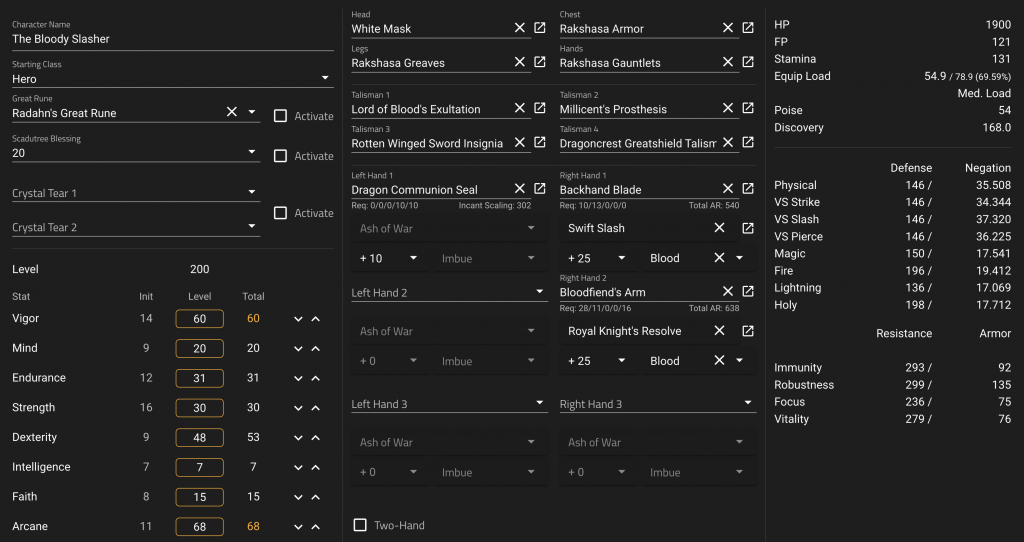
The Bloody Slasher: An Arcane Bleed Build
The Arcane Bleed Build has been a powerhouse in Elden Ring, and Shadow of the Erdtree introduces new tools to make it even more devastating. So let’s explore the ingredients for creating The Bloody Slasher!
Key Equipment
- Weapons:
- Dual-wield Backhand Blades with “Swift Slash” in Blood affinity.
- Bloodfiend’s Arm with “Royal Knight’s Resolve” in Blood affinity (for larger enemies)
- Shield: Actually, none – no risk, no fun. However, the “Spiralhorn Shield” perfectly complements the build, as it inflicts blood loos when you attack with the shield. As a nice side effect it increases Immunity, Robustness and Focus by 50 simply by being equipped. Not to forget, that it’s always helpful to have a lightweight defensive option that excels in parrying.
- Seal: Dragon Communion Seal
- Armor: White Mask, Rakshasa Armor, Rakshasa Gauntlets and Rakshasa Greaves – Alternatively to the Rakshasa armor pieces, use the heaviest armor you can wear while still maintaining a medium roll. Gives you 54 Poise and +6% in the damage you are dealing, with the downside to increase the damage you take by the same amount.
- Talismans:
- Lord of Blood’s Exultation – boosts attack power when blood loss occurs nearby
- Millicent’s Prosthesis – boosts Dexterity and raises attack power with successive attacks
- Rotten Winged Sword Insignia – greatly raises attack power with successive attacks
- Dragoncrest Greatshield Talisman – boosts physical damage negation, reducing all physical damage taken by 20%
- Flask of Wondrous Physick
- Thorny Cracked Tear: Boosts the power of dashing attacks, which synergizes well with the Swift Slash Ash of War on your Backhand Blades.
- Opaline Hardtear: Increases all damage negation types by 15% for 3 minutes
Ashes of War
Backhand Blades
One of the best Ashes of War to use with the Backhand Blades is: Swift Slash!
It stands out as exceptionally powerful for the Backhand Blades for several reasons:
- It provides excellent mobility, allowing you to quickly close distance or evade attacks.
- It deals high damage, with an initial strike followed by an AOE attack behind you.
- It grants i-frames (invincibility frames) during the animation, enhancing survivability.
- It can be spammed even when out of FP to move around quickly.
While Blind Spot (the default Ash of War for the standard Backhand Blade) is also good, providing mobility and solid damage, Swift Slash seems to outperform it significantly.
As our build focuses on rapid attacks and bleed buildup, Swift Slash complements the Backhand Blades’ quick attack style perfectly, allowing for aggressive and mobile playstyles.
Bloodfiend’s Arm
The best Ash of War for the Bloodfiend’s Arm is imho “Royal Knight’s Resolve” and here is why:
- Damage boost: Royal Knight’s Resolve buffs your next attack by a whopping 80%, providing a massive increase in damage output.
- Synergy with charged attacks: The Bloodfiend’s Arm’s strength lies in its charged heavy attacks, which create a bleed-effect AOE. Royal Knight’s Resolve enhances this further.
- Versatility: It works well with both Bleed and Occult affinities, allowing flexibility in build choices.
- FP efficiency: The buff lasts for 10 seconds, giving you time to set up a powerful charged attack without excessive FP consumption.
- Boss-melting potential: When combined with other buffs and the weapon’s innate strengths, it can devastate bosses quickly.
Incantations
- Bloodflame Blade: Adds blood flame to right-hand armament, increasing bleed buildup and adding fire damage, but the you have to use “Swift Slash” in Keen affinity to apply to the Backhand Blades.
- Flame, Grant Me Strength: Creates an invigorating fire within that enhances physical and fire-affinity attack power for 30 seconds.
- Bestial Vitality: Gradually restores HP over time, providing sustained healing during encounters.
- Dragonfire: Transforms the caster to spew dragon fire, dealing fire damage in a cone in front of the user.
- Swarm of Flies: Releases a swarm of frenzied bloodflies that seek out enemies, dealing damage and inflicting Hemorrhage buildup over time.
- Bloodboon: Scatters bloodflame before the caster to set an area aflame, dealing damage and causing blood loss buildup.
- Dragonice: Transforms the caster into a dragon to spew icy breath, dealing frost damage and inflicting frostbite on enemies – to give us another status effect and because it is boosted by the “Dragon Communion Seal”.
- Bayle’s Flame Lightning (2 slots): Incorporate the new Bayle Incantation “Bayle’s Flame Lightning” for high Arcane scaling magical attacks when needed. This incantation channels the dread dragon’s power to strike with a flame-lightning-infused talon bone, dealing heavy damage to a single target and thus making it effective against bosses or tough enemies. It’s having incredible forward range, allowing for effective strikes from a distance and provides good poise during casting.
Stat Distribution (Level 200)
- Vigor: 60
- Mind: 20
- Endurance: 31
- Strength: 30
- Dexterity: 53
- Intelligence: 9
- Faith: 15
- Arcane: 68
Strategy
This build focuses on rapid Bleed buildup using the new Backhand Blades. Their quick attack speed, combined with Blood affinity, allows for incredibly fast Bleed procs. Against larger enemies or when you need more reach, switch to the Bloodfiend’s Arm for heavy attacks that cause significant Bleed buildup.
Use the Dragon Communion Seal to cast Blood-based Incantations like Bloodboon or the new Rotten Butterflies for additional damage over time. The high Arcane stat boosts both your Bleed buildup and the power of these Incantations.
Advanced Tactics
- As an alternative use “Seppuku” on your Backhand Blades before tough fights to dramatically increase Bleed buildup. “Seppuku” benefits more from Arcane investment, while “Swift Slash” is more universally effective. However, “Swift Slash” appears to be more versatile overall – but at least you have a bloody option.
- Use blood-enhancing consumables like “Bloodboil Aromatic” to further increase your damage output.
- Against Bleed-resistant enemies, switch to the Bloodfiend’s Arm and focus on its high physical damage.
- Using “Bloodflame Blade” can be extremely potent: The rapid attacks of “Swift Slash” will maximize the benefits of “Bloodflame Blade’s” bleed buildup and fire damage.
Where to Find Key Items
- Backhand Blades: Found in the Shadow Keep, in a chest near the Church District Site of Grace.
- Bloodfiend’s Arm: Dropped by the Bloodfiend boss in the Abyssal Woods.
- Spiralhorn Shield: Can be found in the northern part of East Liurnia, near the Mausoleum Compound. To find it:
- Start from the Ruined Labyrinth grace in Liurnia.
- Head north towards the Walking Mausoleum in the lower lake.
- Take a sharp left once you reach the lake.
- The shield is located at the top of a hill.
This build excels at rapidly taking down most enemies and bosses in Shadow of the Erdtree, with the versatility to handle Bleed-resistant foes as well. The combination of new weapons and Incantations makes this an upgraded version of the classic Arcane Bleed build.
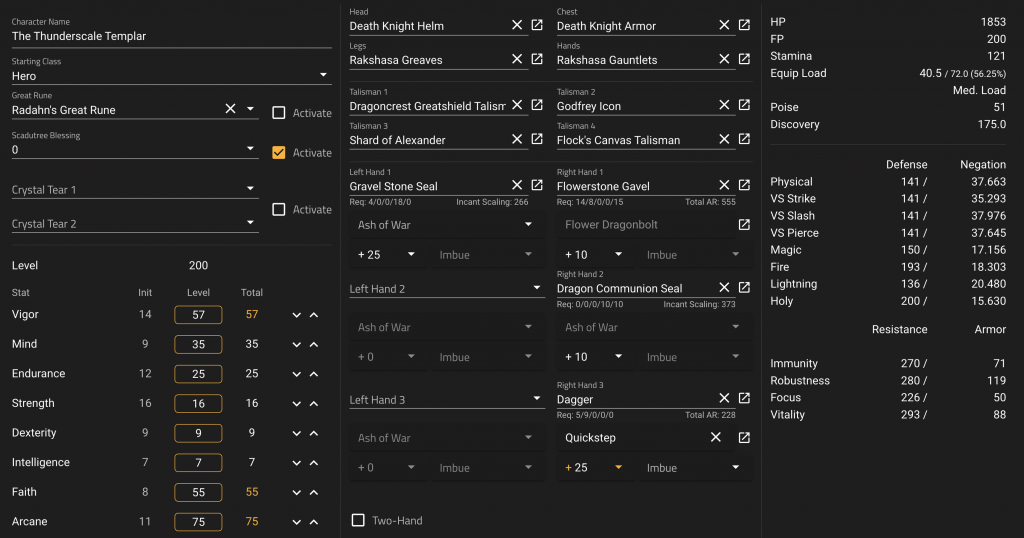
A Flowerstone Gavel Lightning Build – The Thunderscale Templar
Are you ready to harness the raw power of lightning and become a true force of nature in the Lands Between? Look no further than this electrifying build, that combines the power of the new Flowerstone Gavel with lightning incantations to create a devastating arcane/faith hybrid character capable of decimating foes both near and far. By leveraging the weapon’s unique Ash of War and complementary equipment, you’ll rain down red lightning on your foes while buffing your lightning damage to incredible heights. Introducing The Thunderscale Templar.
The Flowerstone Gavel
The Flowerstone Gavel is a dragonstone hammer resembling an ancient flower. Its design features four sharp petals and a pointed core, all capable of dealing heavy damage. The weapon primarily scales with Strength, Dexterity, and Arcane.
Ash of War: Flower Dragonbolt
The Flowerstone Gavel’s unique Ash of War is called Flower Dragonbolt. This skill cannot be replaced, as the weapon cannot be infused with other Ashes of War. The skill’s damage scales primarily with Arcane and costs 18 FP to use.
Flower Dragonbolt applies a lightning damage negation debuff to enemies, that lasts approximately 20 seconds. Charging the skill does not increase the duration of the debuff but appears to slightly increase its strength.
Since this is the main attack we are using, there is no need to pump to many runes into Strength and Dexterity, as you will see.
Upgrade Path
The Flowerstone Gavel uses Somber Smithing Stones for upgrades, following the standard reinforcement path for special weapons. While the weapon’s lore and design suggest a connection to dragon-related abilities and faith, it’s important to note that the Flowerstone Gavel does not scale with Faith, which some players find counterintuitive given its association with Dragon Communion.
Key Equipment
This build revolves around a carefully curated selection of weapons, seals, and armor that synergize perfectly to maximize your lightning damage output:
- Weapons (main hand):
- Flowerstone Gavel with “Flower Dragonbolt ” – you can’t change it anyway
- Optional – Dagger: Put “Endure” on the weapon to tank through enemy attacks while casting your incantation or activating the weapon skill.
- Seals:
- Dragon Communion Seal (main hand): Boosts dragon communion incantations by 15%
- Gravel Stone Seal (off hand): Enhances dragon cult incantations by 15%
- Armor:
- I opted for a compromise: Death Knight Helm and Death Knight Chest Armor for a 4% buff to lightning incantations, paired with Rakshasa Gauntlets and Greaves for a general 4% damage buff. Why not use the full Death Knight set? Well, I learned it wouldn’t boost the weapon skill of the Flowerstone Gravel, so I figured a 4% buff for each of our primary attack types would be a fair split. As a bonus, this combination provides exactly 51 poise.
- Talismans:
- Shard of Alexander – boosts skill damage by 15%
- Flock’s Canvas Talisman – boosts incantation damage by 8%
- Godfrey Icon – enhances charged spells and skills by 15%
- Lightning Scorpion Charm – increases lightning damage by 12% , but increases physical damage taken by 10%
- Alternatively to the Lightning Scorpion Charm use the Dragoncrest Greatshield Talisman – boosts physical damage negation, reducing all physical damage taken by 20%, for some more protection.
- Flask of Wondrous Physick
- Opaline Hardtear: Increases all damage negation types by 15% for 3 minutes. When paired with Boiled Crab and Dragoncrest Greatshield Talisman, it can provide up to 60% damage negation against physical damage with proper armor.
- Lightning-Shrouding Cracked Tear: Boosts the power of lightning attacks by 20% for 3 minutes when consumed.
- Incantations:
- Golden Vow: Increases attack power and defense for the caster and nearby allies.
- Bestial Vitality: Restores HP over time (heals 5 HP per second for 120 seconds, totaling 600 HP)
- Honed Bolt: Calls down a quick bolt of lightning to strike the target area.
- Lightning Spear: Hurls a spear of lightning at enemies.
- Knight’s Lightning Spear: Throws a powerful lightning spear that can be charged for greater damage.
- Ancient Dragons’ Lightning Strike: Summons multiple bolts of red lightning to strike a wide area.
- Fortissax’s Lightning Spear: Conjures Fortissax’s red lightning spear that splits into multiple bolts upon impact.
- Frozen Lightning Spear: Throws a spear of frozen lightning that explodes into icy shards on contact.
Stat Distribution (Level 200)
- Vigor: 57
- Mind: 35
- Endurance: 25
- Strength: 16
- Dexterity: 9
- Intelligence: 7
- Faith: 55
- Arcane: 75
This distribution ensures you have enough health and FP to cast your powerful incantations while maximizing your Faith for increased lightning damage.
Strategy
Your primary strategy revolves around unleashing a barrage of lightning-based attacks while maintaining buffs and debuffs:
- Start encounters by casting Golden Vow for an overall damage boost.
- Use the Flowerstone Gavel’s Flower Dragonbolt skill to apply a lightning resistance debuff on enemies.
- Switch to the Gravel Stone Seal in your right hand for the passive 15% boost to Dragon Cult Incantations.
- Cast powerful lightning incantations using the Dragon Communion Seal in your left hand for maximum damage.
- Reapply the Flower Dragonbolt debuff as needed, or switch to Dragon Communion incantations if desired.
- Engage at range with Lightning Spear or Knight’s Lightning Spear for quick, precise strikes.
- For area-of-effect damage, employ Ancient Dragons’ Lightning Strike to devastate groups of enemies.
- Against tough bosses, unleash Fortissax’s Lightning Spear for massive single-target damage.
- Mix things up with Frozen Lightning Spear for added frost damage and variety.
Build Synergies
- High Arcane investment benefits both the weapon and Dragon Communion incantations.
- The Flowerstone Gavel’s Arcane scaling complements the Dragon Communion Seal’s high incantation scaling at 75 Arcane.
- The weapon’s lightning debuff enhances all subsequent lightning damage, including from incantations.
- Death Knight armor pieces boost Dragon Cult incantations, while Rakshasa pieces provide a general damage increase.
Where to Find Key Items
To assemble this build, you’ll need to track down several important items:
- Flowerstone Gavel: Obtained by completing the Dragon Communion Priestess questline at the Grand Altar of Dragon Communion.
- Dragon Communion Seal: Found in Fringefolk Hero’s Grave, near the start of the game. Requires 2 Stonesword Keys to access.
- Gravel Stone Seal: Dropped by a specific Leyndell Knight in Leyndell, Royal Capital. The knight is found near the Fortified Manor, patrolling by a giant stone dragon corpse.
- Death Knight Set: Found in Darklight Catacombs, on a Death Knight corpse. The catacombs are located in southeastern Scadu Altus.
- Rakshasa Set: Dropped by Rakshasa, an optional boss in the Eastern Nameless Mausoleum.
- Golden Vow: Found at the Corpse-Stench Shack in Mt. Gelmir
- Honed Bolt: Purchased from Brother Corhyn or Miriel, Pastor of Vows after giving the Dragon Cult Prayerbook
- Lightning Spear: Purchased from Brother Corhyn or Miriel, Pastor of Vows after giving the Dragon Cult Prayerbook
- Knight’s Lightning Spear: Purchased from Brother Corhyn in Roundtable Hold or Miriel, Pastor of Vows after giving the Ancient Dragon Prayerbook
- Ancient Dragons’ Lightning Strike: Purchased from Brother Corhyn in Roundtable Hold or Miriel, Pastor of Vows after giving the Ancient Dragon Prayerbook
- Fortissax’s Lightning Spear: Reward for defeating Lichdragon Fortissax – trade with Enia
- Frozen Lightning Spear: Dropped by the Dragonkin Soldier of Nokstella
- Bestial Vitality: Reward from Gurranq, the Beast Clergyman, after giving him the third Deathroot at the Bestial Sanctum
With this build, you’ll become a true master of lightning, striking fear into the hearts of your enemies and leaving a trail of electrified destruction in your wake. Embrace the power of the storm and let your lightning reign supreme across the Lands Between, as the combination of Arcane scaling and lightning synergies creates a unique and potent character capable of handling a wide variety of challenges.
Call to Action
Alright, Tarnished! It’s time to put these builds to the test. Grab your Backhand Blades or Flowerstone Gavel and dive into the Shadow of the Erdtree. Whether you’re painting the lands red with The Bloody Slasher or unleashing lightning fury as The Thunderscale Templar, it’s time to show those bosses who’s boss. Don’t forget to experiment and tweak these builds to suit your playstyle. After all, the best build is the one that feels right in your hands!
Drop a comment below, if you like and let us know how these builds worked out for you.
Final Words
Remember, fellow adventurers, the joy of Elden Ring lies not just in victory, but in the glorious chaos of experimentation. These builds are just the beginning – a springboard for your own creativity. So go forth, wreak havoc, and most importantly, have a bloody good time doing it! May your bleed procs be swift and your lightning strikes true. The Lands Between await your unique brand of mayhem!
But don’t sheathe your weapons just yet, Tarnished! This festival of carnage is far from over. Keep your eyes peeled for the next installment of our mini-series, where we’ll be unleashing two more builds so devastatingly powerful, they’ll make Malenia’s Waterfowl Dance look like a clumsy stumble. Trust me, you won’t want to miss this!
Leave a Reply