The Hefty Scimitar swings exactly like a Dismounter and hits a little softer. A Heavy Knight still starts with one, and a merchant in Limgrave sells a second for 2,400 runes. Every other infusable curved greatsword has to be farmed off an enemy.
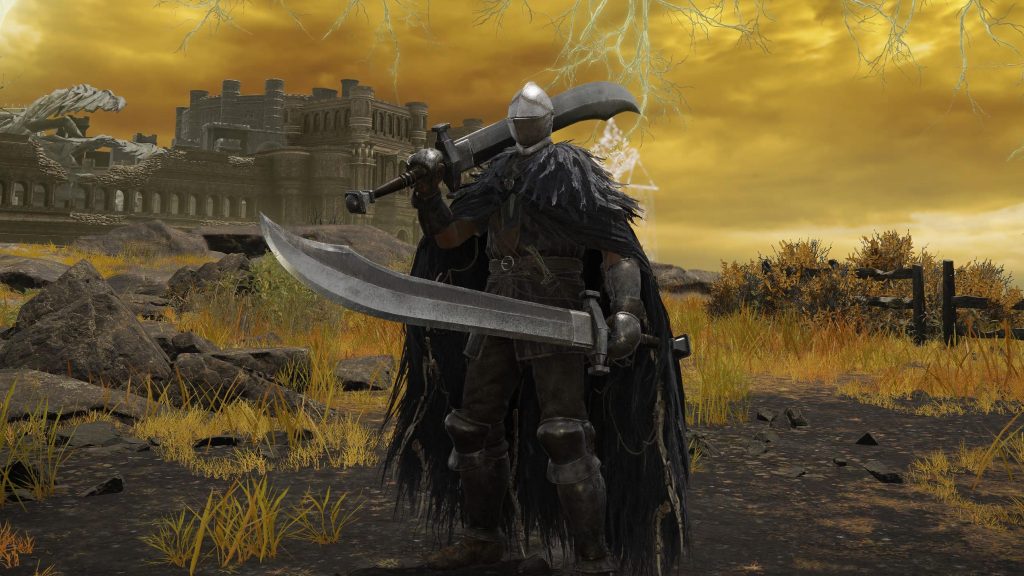
That second copy is the whole argument for the weapon. One Hefty Scimitar beats none of the curved greatswords you already know. A matched pair at level 10, with no drop roll involved, is something nothing else in its class can offer.
Both the scimitar and the Heavy Knight belong to the Tarnished Pack, which is paid DLC on every platform except Switch 2, where the Tarnished Edition includes it. Just wanted to mention that, even though I’m pretty sure you already knew it when clicking this post.
A Dismounter With a Lower Bar
What you are holding:
- Strength 13, Dexterity 11, the lowest requirements of any curved greatsword
- 135 base physical damage, D scaling in both Strength and Dexterity
- 9.5 weight
- Slash damage on every attack
- Spinning Slash as its default skill
- Upgrades on standard Smithing Stones
Put its attack data next to the Dismounter’s and the rows match on every input. The Dismounter starts three points higher on base damage and weighs half a point more. It also asks for 19 Strength and 16 Dexterity.
Some of its cousins get extras. The Omen Cleaver has harder two-handed heavies and Bloodhound’s Fang has stronger jump attacks. The scimitar gets the standard moveset and nothing on top.
Its strength is that it takes any affinity. Fully upgraded it reaches 330 physical on the Standard path, or 305 with A scaling in Strength on Heavy. Blood keeps a B in Strength and Cold keeps a C, so the status versions still reward the stat you were leveling anyway.
Why Two
Hold one in each hand and L1 swings both. Each press lands two hits at 92% of a blade’s attack power, rising to 96% by the third press. The jump attack is where the pair pays off, with two hits at 115% each. Those percentages are the scimitar’s motion values, the share of a blade’s attack power that each attack applies.
| Attack | Motion value | Poise damage | Stamina |
|---|---|---|---|
| Paired jumping L1 | 115 + 115 | 13.2 + 13.2 | 20 + 20 |
| Two-handed jumping heavy | 132 | 22 | 28 |
| Two-handed charged heavy | 165 | 36.3 | 40 |
| Paired L1, first press | 92 + 92 | 6.1 + 6.1 | 15 + 15 |
Two hits each run into the enemy’s defense separately, so 115 plus 115 does not land as 230. A pair also gives up the Strength bonus you get for two-handing a single weapon. Even so, no attack one scimitar has in the air comes close to that total, and the paired version does more poise damage as well.
Status buildup is cut on paired hits. Each one applies 65% of its blade’s buildup. Two Blood scimitars would put 130% on the bar per press. A Blood blade and a Cold blade put 65% each on two separate bars. That is slower per status, but two different payoffs build at once.
Heavy Knight or the Merchant
Any class can buy the scimitar. The Nomadic Merchant on the eastern edge of Mistwood, south of the Minor Erdtree and northwest of Fort Haight, stocks exactly one for 2,400 runes. That stock of one decides the question, because a Heavy Knight who buys it owns two and everybody else owns one.
The class itself starts at level 10:
| Vigor | Mind | End | Str | Dex | Int | Faith | Arc |
|---|---|---|---|---|---|---|---|
| 14 | 8 | 17 | 15 | 11 | 7 | 8 | 9 |
Its Dexterity is exactly what the scimitar asks for, and its 17 Endurance is the highest any class starts with. It also arrives wearing the full Steel set, which costs every other class 4,500 runes at the Isolated Merchant’s shack.
In its full starting kit the Heavy Knight fat rolls, which the character screen never mentions. The armor weighs 43.8 and the scimitar 9.5, for 53.3 against a maximum load of 59.3. A medium roll needs you under 70%, which at 17 Endurance means 41.5.
The Same Trip to Caelid
The opening moves come straight from the Reed Great Katana build. Open the trap chest under the Dragon-Burnt Ruins, ride around Sellia, and loot Radagon’s Soreseal at Fort Faroth. Then bait the Night’s Cavalry north of Lenne’s Rise off its ledge with a Gold-Pickled Fowl Foot running, for roughly 54,000 runes. That article has the route in detail, and a Heavy Knight changes four steps of it.
- Take off the helm and gauntlets before you leave. Chest, greaves and one scimitar weigh 39.3, under the 41.5 limit, so you medium roll through Caelid at level 10.
- Pick up Cragblade while you are in Caelid. It’s quite a Torrent ride, but part of the build. A scarab near the Sword Monument, west of the Impassable Greatbridge grace, drops the Ash of War this build uses in the main hand.
- Skip the Isolated Merchant. You already own the Steel set, and the 4,500 runes stay in your pocket.
- Finish at Fort Haight. Back in Limgrave, buy the second scimitar from the Nomadic Merchant, then ride on to the fort next door. It holds the Ash of War for the off hand and the Dectus Medallion (Left), the partner to the half you picked up at Fort Faroth.
Carrying Two Blades
A second scimitar adds 9.5 to everything, and the Soreseal weighs 0.8 itself. The table shows the lowest Endurance that still gives a medium roll.
| Loadout | Weight | Poise | Endurance needed |
|---|---|---|---|
| One scimitar, chest and greaves | 39.3 | 54 | 16 |
| Two scimitars, chest and greaves, Soreseal | 49.6 | 54 | 25 |
| The same plus the Claw Talisman | 50.3 | 54 | 25 |
| One scimitar, full Steel set | 53.3 | 77 | 29 |
| Two scimitars, full Steel set | 62.8 | 77 | 40 |
The second row is the build. The Soreseal lifts the Heavy Knight’s 17 Endurance to 22, which is three short. Spend three levels on Endurance and the pair medium rolls in chest and greaves.
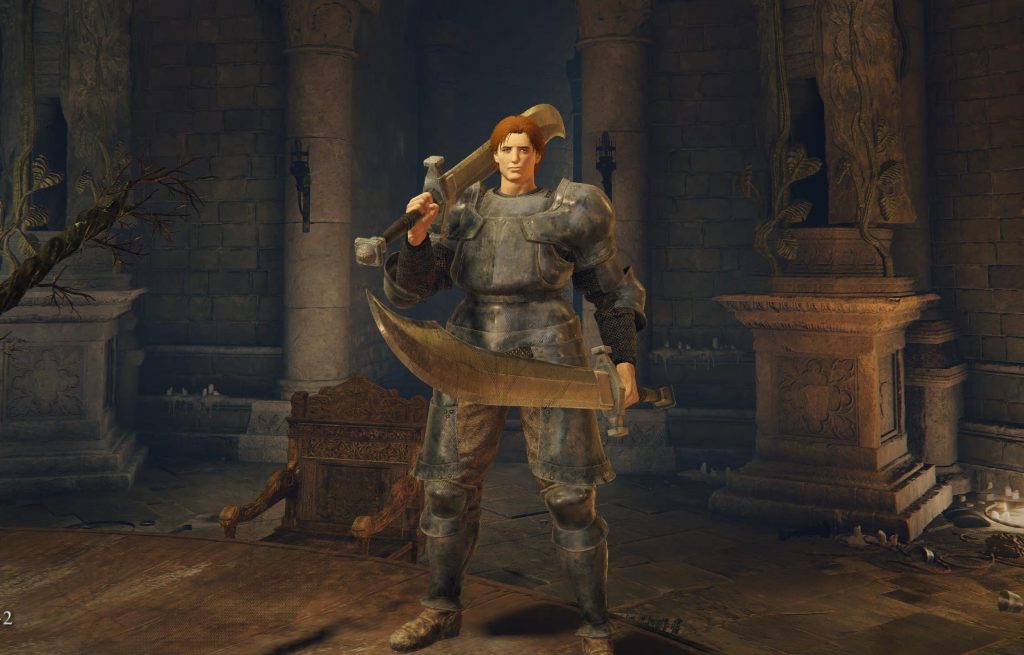
Those two pieces give 54 poise, past the 51 you need to take a hit from most standard enemy attacks and keep swinging. The gauntlets come back on the Altus Plateau, under a different chest piece.
The third row is tight. With the Claw Talisman equipped you carry 50.3 against a limit of 50.4.
Where the Runes Go
Of the 54,000 runes, 2,400 go to the second scimitar, which leaves 51,600 for levels. Going from level 10 to 28 costs 46,776. You finish with 4,824 in hand, 404 short of level 29, so a handful of kills on the ride home buys one more.
Eighteen levels, split two ways.
| Stat | Start | Levels | At level 28 | With Soreseal |
|---|---|---|---|---|
| Vigor | 14 | 15 | 29 | 34 |
| Endurance | 17 | 3 | 20 | 25 |
| Strength | 15 | 0 | 15 | 20 |
| Dexterity | 11 | 0 | 11 | 16 |
Strength gets nothing yet, and that is deliberate. On barely upgraded weapons base damage is most of what you swing. Meanwhile the Soreseal adds 15% to every hit you take, on a class that starts with 14 Vigor.
After level 28 the priority flips and Strength takes the levels, since both the Blood and the Cold scimitar scale with it.
The pair’s running cost shows up at the smithing table, where every upgrade has to be paid for twice. Expect the off-hand blade to trail the main hand for most of the early game.
Blood Now, Frost Later
Ash of War: Bloody Slash drops from the knight at the top of the Fort Haight ramparts. Put it on a scimitar and the blade takes the Blood affinity. Fully upgraded that is 279 physical, B scaling in Strength and 100 blood loss buildup.
The skill is a poor fit for this character. Bloody Slash scales with Arcane whatever the affinity, and the Heavy Knight has 9. Each use also costs 6 FP, 5% of your maximum HP and another 50 HP on top.
You never have to use it. With a weapon in each hand, only the main hand’s skill fires. Put the Blood scimitar in your left hand, where Bloody Slash does nothing except supply the affinity. The right-hand scimitar gets Cragblade, from the scarab you met in Caelid.
Cast it and for 60 seconds the blade deals 15% more physical damage, 10% more poise damage and 50% more stamina damage.
Leave the right-hand scimitar on the Standard path for now. Cragblade also offers Heavy, which pays off once Strength is high. At 20 the scaling adds little.
In Liurnia the right hand turns Cold. The Glintstone Whetblade unlocks that affinity for Cragblade. It lies on a corpse in Raya Lucaria Academy, north of the Debate Parlor grace, up the broken staircase on the west side of the courtyard.
Fully upgraded, a Cold scimitar deals 234 physical and 185 magic damage with 127 frost buildup, and keeps C scaling in Strength. Cragblade raises only the physical part.
Frostbite takes 10% of a regular enemy’s maximum HP plus 30, or 7% plus 30 from a boss. It also cuts the target’s damage negation by 20% for 30 seconds, which helps every hit from the Blood blade.
Late in the game the left hand can carry Cragblade as well. The Black Whetblade, on a corpse beside the altar in Night’s Sacred Ground in Nokron, unlocks Blood for it. Smithing Master Hewg makes the second copy in exchange for a Lost Ashes of War.
To run both buffs, two-hand the left scimitar, cast, then switch back to the pair and cast again. Each blade keeps its own buff.
Feathers for the Chest
On the Altus Plateau the Steel chest gives way to Raptor’s Black Feathers. The piece sits in a chest behind an illusory wall in Sage’s Cave and adds 10% to jump attack damage. That multiplies with the Claw Talisman, for 26.5% together.
At 15 poise the feathers need help to stay above 51. Put the Steel Gauntlets back on and buy the Knight Helm from the Twin Maiden Husks at Roundtable Hold for 3,000 runes.
| Piece | Weight | Poise |
|---|---|---|
| Raptor’s Black Feathers | 7.7 | 15 |
| Knight Helm | 4.6 | 8 |
| Steel Gauntlets | 6.1 | 10 |
| Steel Greaves | 11.3 | 19 |
| Total | 29.7 | 52 |
The set weighs a tenth less than the Steel chest and greaves, so 25 Endurance still carries it with both scimitars and both talismans.
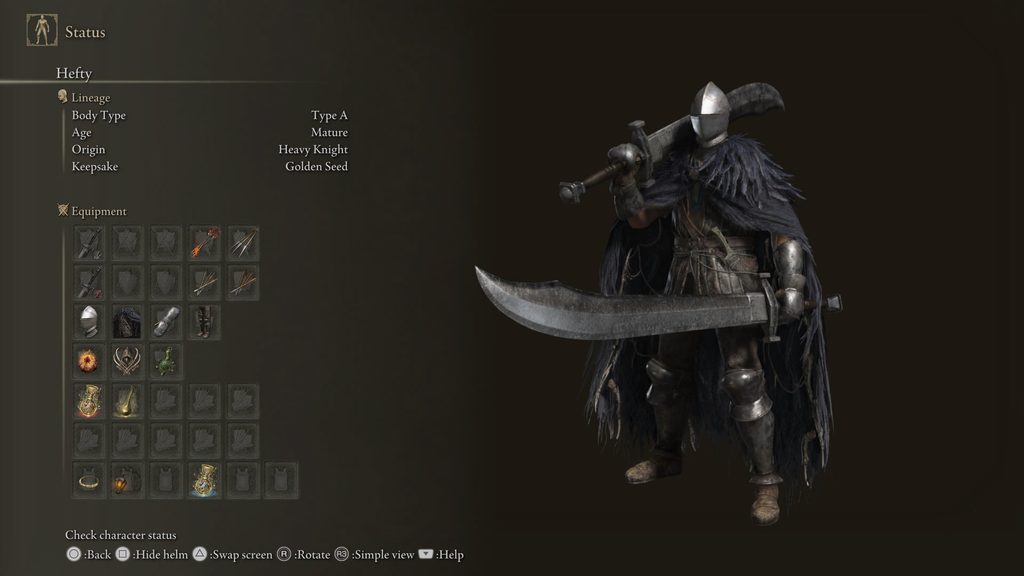
If you have the runes to spare and want to keep the Heavy Knight’s look, leave the Steel Helm on. The set then weighs 33.0 with 57 poise, and the medium roll takes 30 Endurance, five levels more.
I think the Knight Helm looks better in combination with the other parts than the Steel Helm and five levels is quite an investment, but that’s just my personal opinion.
Talismans
Radagon’s Soreseal fills the first slot for the same reason it does on the katana build. Its five points of Endurance are what let you carry the second blade. Vigor, Strength and Dexterity each get five as well, and you pay with 15% more damage taken.
The second slot opens after Margit, and it goes to the Claw Talisman. It adds 15% to jump attack damage, which is the attack this whole build is arranged around. It does nothing for Ashes of War. That costs this build little, since Cragblade is a buff and the jump attacks do the damage.
You find it in Stormveil Castle, on a corpse at the top of a watchtower. From the Rampart Tower grace, head outside and cross the rooftops to a ladder. Three enemies wait on a raised platform to the left of it and a fourth plays dead on the right. Deal with them before you climb.
Slot three goes to the Winged Sword Insignia, which the Cleanrot Knight drops in Stillwater Cave. Successive hits raise your attack power in steps, up to 10%, and a pair lands two hits with every press of L1. Without a fresh hit it loses a point every 0.4 to 1 second, so the slower jump attacks keep it up less well than an L1 chain. That suits a build that switches between the two, with the Claw Talisman paying for the jumps and the insignia for the chains.
A paired L1 press costs 30 stamina and a paired jump attack 40, so the bar empties fast. If that bothers you more than the damage, put the Green Turtle Talisman in slot three instead. It adds 8 stamina per second to your recovery. It sits in a chest in the cellar of Summonwater Village in northern Limgrave, behind a fog wall that costs one Stonesword Key. Together with the Greenspill Crystal Tear in your flask you recover faster and have more to spend, until slot four changes the arrangement.
Slot four opens after the Golden Shade of Godfrey in Leyndell. My pick is the Viridian Amber Medallion +1, a guaranteed drop from Margit’s second ambush in the Capital Outskirts, south of the Outer Wall Battleground grace. Walk up to the commoner standing there and he drops the disguise. The medallion raises maximum stamina by 13% and weighs only 0.3.
With it the stamina pair swaps roles. The talisman now covers the size of the bar, so the flask takes the Greenburst Crystal Tear and its faster recovery. If you ran the Green Turtle, slot three is free again for the Winged Sword Insignia.
Late in the game, trade Radagon’s Soreseal for Erdtree’s Favor +1 and lose the 15% damage penalty. It adds 3.5% HP, 8.5% stamina and 6.5% equip load. It sits in a chest in the Cathedral of the Forsaken, behind Mohg, the Omen, at the bottom of the Subterranean Shunning-Grounds. The equip load bonus does not replace five points of Endurance, so put five levels into Endurance before you make the swap.
Wondrous Physick
The flask holds two tears, and each runs for three minutes after you drink.
Start with the Greenspill Crystal Tear and the Strength-knot Crystal Tear. Greenspill raises maximum stamina by 15%. It rests on an altar at the Minor Erdtree in Mistwood, a short walk from the merchant who sells the second scimitar. Strength-knot adds 10 Strength, which is a lot on a character that has not spent a single level there yet. A troll guards it on a clifftop northeast of the Stormhill Shack, west of the Warmaster’s Shack.
Swap Strength-knot for the Opaline Hardtear once you have beaten the Putrid Avatar at the Minor Erdtree north of Fort Faroth. It cuts all incoming damage by 15%. Against the Soreseal’s penalty that comes out slightly in your favor, since 1.15 times 0.85 is 0.98.
When the Viridian Amber Medallion +1 goes into slot four, Greenspill makes way for the Greenburst Crystal Tear. It adds 15 stamina per second to your recovery for three minutes, and drops from the Putrid Avatar at the northwestern Minor Erdtree in Caelid, near the Smoldering Church. From then on the flask holds Greenburst and Opaline, for faster stamina recovery and 15% less damage taken.
Some Notes From the Field
For stamina there is one more option. Starscourge Radahn drops his Great Rune, the Divine Tower of Caelid restores it, and once you equip it at a Site of Grace, a Rune Arc raises maximum HP, FP and stamina by 15% until you die. Early on, Godrick’s Great Rune is the better all-round pick, since it adds 5 to every attribute. For stamina alone Radahn’s gives more at every Endurance level. At 25 Endurance it adds 18 stamina, where Godrick’s five extra points add 9. Only one Great Rune can be active at a time.
After Godfrey I slotted in the fourth talisman and walked into a miserable Morgott fight with every dodge coming out wrong. Only after he killed me did I notice why: the extra weight had tipped me into a fat roll. I took the talisman off, went back in, and the fight went a lot better. Don’t forget to check your equip load every time you change your loadout.
If the Fire Giant gives this setup trouble, put Wild Strikes on the main-hand scimitar in Cold affinity for that fight and two-hand it after phase one. That keeps the damage steady through phase two. Until he gets there, the usual jump attacks do the work. The scarab that drops Wild Strikes waits on the road from the Stormhill Shack toward Castleward Tunnel, and the Glintstone Whetblade lets it keep the Cold affinity. For the length of the fight it replaces Cragblade.
If you know where to stand in phase two and when to land a jump attack on his hands, you don’t need the swap at all.
I’ll keep repeating this one. Put the Golden Vow Ash of War on a spare dagger. It is the weaker cousin of the incantation, but it doesn’t ask for 25 Faith, and it stacks multiplicatively with Flame, Grant Me Strength.
That incantation asks for more. It needs 15 Faith, seven levels above the Heavy Knight’s 8. It sits on a corpse behind Fort Gael, between two flame chariots, and adds 20% physical damage, 20% fire damage and faster stamina recovery for thirty seconds.
Final Words
This build did better than I expected. The Hefty Scimitar is a solid weapon, but not the best curved greatsword in the game. What sets it apart is how easy it is to get, with one from the starting class and a second from a merchant in Limgrave. It also hits hard on a Heavy infusion and takes any affinity or Ash of War you want to try.
With a single scimitar on a Strength character, Heavy is the obvious infusion. Keen moves the scaling to Dexterity and Lightning splits the damage in two. Cold and Blood give up physical damage for status buildup.
A pair changes that. With one blade in Cold and one in Blood, two status bars fill at once and make up for the lower physical numbers. The paired jump attack also deals enough stance damage to break enemy poise.
Add the Heavy Knight and you start the game in the best early-game armor for poise and physical damage negation. The Strength, Endurance and poise this build collects carry over to any other heavy weapon you find along the way.
All of this was about making the Hefty Scimitar work, and the Heavy Knight came along because it is the one class that owns two. The class deserves a build of its own. It starts with 77 poise and the Steel set’s 36.3 physical damage negation, which points toward a tank build – probably with a shield and a thrusting weapon. That is another article.
If you run this build, tell me in the comments how the jump attacks treated you.
Leave a Reply