
Fellow Tarnished, tired of your special weapons feeling more “special needs” than “special forces”? Don’t worry—we’ve all been there. This guide will get your favorite boss weapon hitting like it’s supposed to, and faster than you think.

I’m about to walk you through the fastest route to collect Somber Smithing Stones 1-9, getting you from zero to hero faster than you can say “praise the sun.” This isn’t just another boring location list – this is your roadmap to power, optimized for speed and minimal boss encounters.
Why This Route Works
Before we dive in, let’s talk strategy. You need 137 of each Somber Smithing Stone type to fully upgrade everything in the game, but realistically, you’re probably working on 2-3 weapons maximum. The beauty of this approach is that you can get a +9 somber weapon with hardly any bosses defeated – though you’ll need to defeat a few enemies and make some strategic purchases.
The secret sauce? Smithing Master Iji sells a wide variety of Somber Smithing Stones, and certain locations in Caelid give you access to high-tier stones ridiculously early. We’re talking about grabbing Somber Smithing Stone [8] and [9] before you’ve even touched Margit.
The Early Game Power Spike: Levels 1-4
Get to Smithing Master Iji
Your first priority is reaching Smithing Master Iji at Liurnia of the Lakes. Here’s the fast track:
- Skip Stormveil entirely – take the path around the castle through the ravine
- Head to the northwest section of Liurnia
- Find Iji on the road leading to Caria Manor
Once you talk to Iji, you can purchase:
- Somber Smithing Stone [1] for 2,000 Runes each (unlimited)
- Somber Smithing Stone [2] for 3,000 Runes each (unlimited)
- Somber Smithing Stone [3] for 4,000 Runes (limited stock)
- Somber Smithing Stone [4] for 6,000 Runes (limited stock)
Rune Farming Tip: If you’re short on runes, stop at the Sorcerer’s Isle Site of Grace. There are 5 ballons nearby in the air that you can shoot down to get 5x Rune [6] (2000 runes each equals 10.000 runes). Southwest from the grace there are a couple of sarcophagi from which you collect 2x Rune [1], 3x Rune [2], 5x Rune[3], 2x Rune [4] and 1x Rune[5] what sums up to 9600 runes. That’s 19.600 runes in total and more than you need to buy somber stones 1-4 from Iji.
Alternatively, head to the sleeping dragon in Caelid for easy farming. First, grab a Gold-Pickled Fowl Foot – the earliest one is on the beach south of the First Step Site of Grace, surrounded by undead skeletons, or at the base of the crucifix on a small hill in West Limgrave. Use the Gold-Pickled Fowl Foot just short before slaying him to boost your rune gains by 30%, then bleed the dragon to death for 67,350+ runes (or 87,555+ with the buff) without it fighting back.
Supplement with Limgrave Quick Pickups
While you’re in Limgrave, you can grab these easy stones:
Somber Smithing Stone [1]:
- On a corpse sitting on a chair west of Waypoint Ruins
- Southwest of the Artist’s Shack, held by a Teardrop Scarab
- The Lion Guardian of Stormveil drops one (if you do decide to tackle Stormveil)
Somber Smithing Stone [2]:
- One from Blaidd if you summon him to defeat Bloodhound Knight Darriwil at the Forlorn Hound Evergaol in Limgrave
- Northeast of Academy Gate Town Site of Grace – kill the Teardrop Scarab near the sunken roof (beware: 4 Albinauric will spawn when you approach)
- On a corpse surrounded by Spirit Jellyfish on the beach in the Weeping Peninsula
The Mid-Game Hunt: Levels 3-6
Here’s where things get interesting. Instead of unlocking infinite purchasing through Bell Bearings (what you can do later on, but requires defeating bosses), you can hunt a couple of individual stones basically for free.
Add Early Liurnia Pickups
Once you bypass Stormveil and reach Liurnia, you can grab these quick stones:
Somber Smithing Stone [3]:
- Forest north of the Grand Lift of Dectus – scarab drops one
- Under a large rock outside the Carian Study Hall – kill the Scarab
- East Raya Lucaria Gate – on a corpse sitting on a chair on the shoreline south
Somber Smithing Stone [4]:
- Southwest of The Ravine site of grace – on a dead body sitting on a chair
- Ravine-Veiled Village – Scarab drops one
The Sellia Crystal Tunnel Shortcut
Before we continue, here’s a massive early game shortcut: Go to Dragon-Burnt Ruins in Limgrave and open the trapped chest. This teleports you directly to Sellia Crystal Tunnel where you can grab 3 Somber Smithing Stone [4] immediately – if you survive the hunt. The first is on a wooden platform opposite the first ladder you climb, and the other two are white stones you can pick up from the ground.
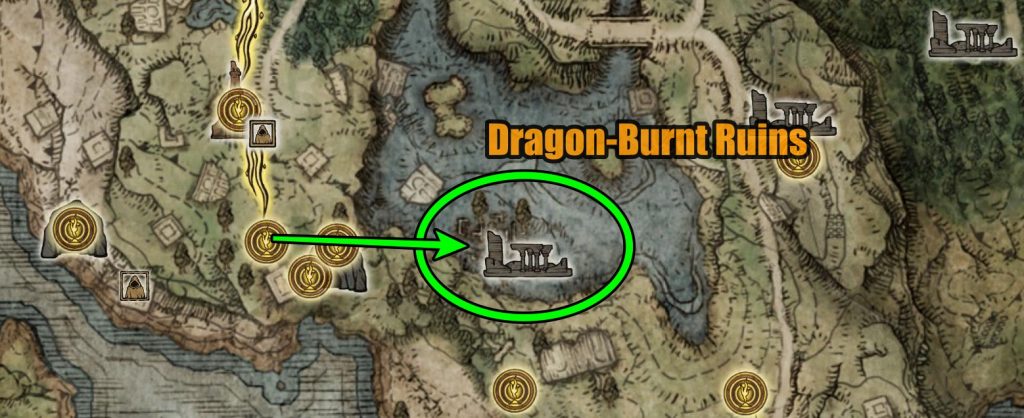
As you’ll soon discover, this shortcut leads directly to Somber Smithing Stones 8 and 9.
Early Power Spike: Levels 5-6
Here’s where you can really start flexing. These higher-tier stones are accessible surprisingly early if you know where to look.
Somber Smithing Stone [5]:
- Caelid route: From Inner Aeonia site of grace in the Swamp of Aeonia or when exiting the Sellia Crystal Tunnel, travel northwest to a narrow ravine guarded by exploding Stone Worm monsters. At the end, near a floating Stone Face monster and giant crystal, you’ll find the corpse with the stone.
- Gaol Cave: Inside a chest in the same area where you can pull a lever to open all the jail cells
- Volcano Manor shortcut: Let the Academy Iron Maiden eat you to teleport to Volcano Manor, then head southwest from Temple of Eiglay – the corpse is hanging on a ledge east from the cage elevator
Somber Smithing Stone [6]:
- Guaranteed early: Kill the Fallingstar Beast at the end of Sellia Crystal Tunnel (accessible via Dragon-Burnt Ruins trap chest)
- Volcano Manor: After the Visitor’s room grace, climb to the roof of the house on the right side of the lava river downstairs
- Old Altus Tunnel: Behind the shack in the bottom section guarded by Leyndell Knights
The Caelid Power Grab: Levels 7-9
Here’s where this route gets absolutely wild. In Dragonbarrow you can easily get an 8 and a 9 (both are near the Divine Tower) but the earliest you can find a 7 anywhere is Volcano manor.
The Dragonbarrow Double-Dip
Use the Sellia Crystal Tunnel Shortcut. To safely exit the tunnel, move right down the path while crouching to avoid enemy attention – don’t forget to sit down at the Site of Grace before leaving the tunnel. After exiting turn right and head towards Dragonbarrow.
Somber Smithing Stone [8]: The earliest Somber Smithing Stone 8 you can obtain is from a Scarab located in Dragonbarrow in Caelid. This Scarab can be found on a large protruding tree root between the Dragonbarrow West and the Divine Tower of Caelid.
Somber Smithing Stone [9]: Right after getting the [8], head down to the base of the Divine Tower. Found on a corpse in a circle of chairs south of Divine Tower of Caelid. The path is not tricky to find – from the Dragonbarrow West Site of Grace, hug the left side of the spring with two dragons and turn around to follow a ramp leading down to the chairs.
The Level 7 Problem
Somber Smithing Stone [7] is notoriously the hardest somber stone to get. Your best early options are:
Option 1: Volcano Manor (Recommended)
- Get yourself a somber weapon, a few sleep pots and level up to +6. Obtain the Fevor’s Cookbook to craft sleep pots first – it is found in Limgrave, on a corpse sitting upright in the graveyard on a plateau south of the Summonwater Village Outskirts Site of Grace.
- Kill the Godskin Noble behind the fogwall just behind the big bridge.
- Use sleep pots until he falls asleep, then hit him until he stands up, throw some pots again and repeat.
Option 2: Leyndell Sewers
Access Leyndell’s Subterranean Shunning-Grounds beneath the capital. There are multiple Somber Smithing Stone [7] locations here: one from a Teardrop Scarab in the pipes near the giant crayfish, and others on corpses in various areas of the sewers. This area also contains a Somber Smithing Stone [8] if you continue to the room with an Omen guarding the ladder.
If you are not yet sure about what somber weapon to pick, check out our article “Elden Ring: Get the Best Somber Weapons for Early & Mid-Game” for advice.
Bell Bearing Locations for Later
Once you’re ready to tackle tougher areas, here are the Bell Bearing locations:
Somberstone Miner’s Bell Bearing [1] – Limgrave
Location: Sellia Crystal Tunnel, Caelid Boss: Fallingstar Beast Reward: Somber Smithing Stone (1) and (2) purchase access Bonus: As mentioned above, you receive a Somber [6] for defeating the boss.
Getting There: Players can access this cave early in the game by using the teleporter chest trap in Limgrave’s Dragon-burnt Ruins.
Somberstone Miner’s Bell Bearing [2] – Altus Plateau
Location: Altus Tunnel (requires both halves of the Dectus Medallion) Boss: Crystalian (Spear) & Crystalian (Ringblade) Reward: Unlimited Somber Smithing Stone [3] and [4] purchase access
The Altus Tunnel is located south of the Minor Erdtree in Altus Plateau. The Crystalian duo can be tricky, but here’s the strategy: These bosses are highly resistant to most forms of damage until players break their poise and critically hit them. Use heavy attacks and jump attacks to break their poise, then unleash hell.
Somberstone Miner’s Bell Bearing [3] – Mountaintops of the Giants
Location: First Church of Marika Requirement: No boss fight for the item itself, but reaching this area requires defeating multiple story bosses Reward: Unlimited Somber Smithing Stone [5] and [6] purchase access.
This one’s a freebie. Found in a corpse just outside the First Church of Marika in Mountaintops of the Giants. It is right in front of the entrance. Since it is snowy the white glowing item is hard to spot. Note: This is a late-game Bell Bearing that requires substantial story progression to reach.
Somberstone Miner’s Bell Bearing [4] – Crumbling Farum Azula
Location: By the Tempest-Facing Balcony site of grace Found: On a corpse at the edge of the cliffs Reward: Somber Smithing Stone 8, Somber Smithing Stone 7, and Sanctuary Stone as purchasable items
Somberstone Miner’s Bell Bearing [5] – Crumbling Farum Azula
Location: From the Dragon Temple Rooftop Site of Grace, continue toward the dragon while sticking to the right side Found: Found in a small church with some Azula Beastman enemies Reward: Purchase Somber Smithing Stone [9] from the Roundtable Hold
The Optimal Route Summary
Here’s your updated step-by-step power progression for maximum efficiency with minimal combat:
- Liurnia Shopping: Bypass Stormveil Castle into Liurnia and buy stones [1]-[4] from Master Iji.
- Caelid Pickup Run: Go to Dragon-Burnt Ruins in Limgrave and open the trapped chest. This teleports you directly to Sellia Crystal Tunnel. After escaping the tunnel turn right, collect somber [5] in the Inner Aeonia ravine (as it is on the route), skirt around the northern edge of the swamp and look for a path leading to the north. Find the ridge path and follow the roots/branches to the Divine Tower for for [8] and [9] from pickups.
- Volcano Manor Shortcut: Enter Raya Lucaria and let the Academy Iron Maiden eat you, then grab [5] and [6] from corpse pickups (avoid fighting) in Volcano Manor. You can find the stones on the rooftops of the houses in the lava swamp.
- Level 7 Reality Check: Somber [7] requires either boss fights or late-game areas – no easy shortcuts here.
- Bell Bearing Collection: When you’re ready to fight, grab Bell Bearings for unlimited purchasing.
Pure “Zero Combat” Route: Steps 1-3 can get you to +6 weapons using only pickups and purchases – no boss fights required. For +7 and beyond, you’ll need to engage in combat.
Pro Tips for the Road
- Travel light: You don’t need to fight everything. Many of these locations can be reached with strategic running and Torrent.
- Rune management: If you’re short of cash you can always head to any of our Elden Ring Rune farming locations
- Weapon priority: Focus on upgrading one weapon to +9 before spreading resources thin
- Bell Bearing strategy: The items unlocked after offering Bell Bearings to the Twin Maiden Husks can be carried over to NG+
The Bottom Line
With this route, you can have a +9 unique weapon incredibly early in your playthrough. It’s possible to get a weapon to +9 with hardly any fights – though you’ll need to defeat the Godskin Noble for that crucial [7] stone.
The beauty of this approach is that it scales with your ambition. Want a quick +6 weapon? Hit up Iji and grab the Volcano Manor stones. Ready to go all the way? Follow the complete route and you’ll be wielding end-game power before most players have cleared Limgrave.
Remember, there are only 8 Somber Ancient Dragon Smithing Stones in the base game for reaching +10, so choose your final upgrades wisely. But getting to +9? That’s absolutely achievable with this route, and it’ll serve you well through most of the game’s challenges.
I personally prefer taking a longer route, which lets me collect Golden Seeds, Sacred Tears, the Wondrous Physick, Talismans, Ashes of War, and more along the way. That said, the direct route outlined here establishes the essential strategy for my runs built around a somber weapon, and it’s extremely effective. If your top priority is to secure Somber Smithing Stones as fast as possible, the streamlined path is the clear winner.
Now get out there and show those bosses what a properly upgraded unique weapon can do. Your journey from Tarnished to Elden Lord just got a whole lot shorter.
As always: Don’t forget to explore even more secrets with our other Elden Ring Guides & Tips.
Leave a Reply