Hey there, fellow Elden Ring adventurer! If you’re anything like me, you’re hooked on the vast world of the Lands Between and the endless possibilities it offers. I’m thrilled to share my expertise with you on creating a formidable level 150 melee build that will have you slicing through the Lands Between like a pro. Introducing “The Godbreaker” – a build designed to shatter the defenses of even the mightiest foes. In this comprehensive guide, we’ll dive into the nitty-gritty of attribute allocation, equipment choices and more, ensuring you’re well-equipped to take on the toughest challenges the Lands Between has to offer. With “The Godbreaker” at your fingertips, you’ll be ready to live up to its name and bring even the most powerful enemies to their knees.
While we’ll be focusing on a strength-based build, we won’t leave you hanging – we’ll also touch on some alternative melee options to keep things interesting. So, buckle up, gear up, and let’s get ready to conquer the world of Elden Ring!
Understanding Melee Builds
Before we dive into the specifics of our build, let’s discuss what melee builds are and their general strengths and weaknesses (If you are an experienced explorer of the Lands Between and already blessed with this knowledge you can jump directly to the chapter The Big Bonk Approach).
Melee builds in Elden Ring focus on close-quarters combat, primarily using weapons like swords, axes, hammers and other arms that require you to be up close and personal with your enemies. These builds typically emphasize attributes like Strength, Dexterity and Endurance to maximize damage output and sustain prolonged fights.
Attributes and Scaling
- Strength: Primarily governs the damage of strength-scaling weapons and also affects the character’s equip load.
- Dexterity: Impacts the damage of dexterity-scaling weapons and affects the character’s cast speed and ability to dodge attacks.
- Vigor: Increases the character’s health pool, essential for survivability in melee combat.
- Endurance: Improves the character’s stamina, crucial for executing attacks, blocking, and sprinting.
Playstyles
- Quality Builds: Balance Strength and Dexterity to wield a wider range of weapons effectively.
- Strength Builds: Focus on heavy weapons and armor for high damage output and defense. This is what we are going to explore in this guide.
- Dexterity Builds: Utilize lighter weapons and armor for faster attacks and increased mobility.
Pros of Melee Builds
- High damage potential, especially with properly upgraded weapons
- Ability to stagger enemies and bosses, opening them up for critical hits
- Less reliant on consumables (FP flasks) compared to magic builds
- Often have higher physical defense due to heavier armor
- Straightforward playstyle that’s easier for new players to grasp
Cons of Melee Builds
- Require closer engagement with enemies, increasing risk
- Limited ranged options, which can be challenging for certain encounters
- May struggle against highly mobile or flying enemies
- Often have lower resistance to magical attacks
- Can be stamina-intensive, requiring careful management
Despite these challenges, melee builds remain popular due to their satisfying gameplay and the visceral feel of close-quarters combat. Whether you prefer brute force or lightning-fast strikes, there’s a melee weapon and playstyle to suit your tastes. The build we’re about to explore mitigates many of these cons while maximizing the pros.
The Big Bonk Approach
The “Big Bonk” approach in Elden Ring – for when finesse is overrated and you’d rather solve problems by introducing them to a comically oversized chunk of metal or stone! This strength-based melee build is all about channeling your inner caveman and asking the age-old question: “Why dodge when you can SMASH?”
This type of build is perfect for players who believe that every problem can be solved by hitting it hard enough. Invest those runes in strength and endurance, slap on the heaviest armor you can find, and prepare to turn bosses into pancakes. Remember, in the world of Big Bonk, stamina management is just a suggestion, and the true combo is “bonk, bonk and more bonk.”

Picture this: You’re strolling through the Lands Between, casually lugging around a weapon that looks like it was ripped straight from a giant’s toolbox. Enemies see you coming and think, “Surely they can’t swing that thing.” Oh, but you can, and you will – with gusto!
Embrace the BONK lifestyle
Let me tell you, what makes this approach so attractive.
- Jump Attacks are your jam: Launch yourself into the air and come crashing down with the force of a thousand collapsing stars.
- Charge Attacks? Oh yeah! Wind up those massive weapons and release a blow that’ll make the earth tremble.
- Poise? More like POISE DESTROYER! Stagger enemies with every swing and leave them wide open for a follow-up BONK.
- Armor? It’s not just for fashion. Don the heaviest armor you can find and become an unstoppable force of nature.
- Learn the dance of destruction: Boss fights become a thrilling game of “whack-a-mole” as you punish every opening with a glorious BONK.
So, if you’re tired of all that rolling and parrying nonsense, why not give the Big Bonk a whirl? After all, nothing says “git gud” quite like flattening Malenia with a weapon that looks like it belongs in a medieval construction site!
Still, the Big Bonk approach isn’t for the faint of heart, but for those who crave a visceral, satisfyingly simple playstyle. So grab your biggest weapon, put on your angriest face, and get ready to unleash the BONK upon the Lands Between!
Character Attributes of The Godbreaker Build
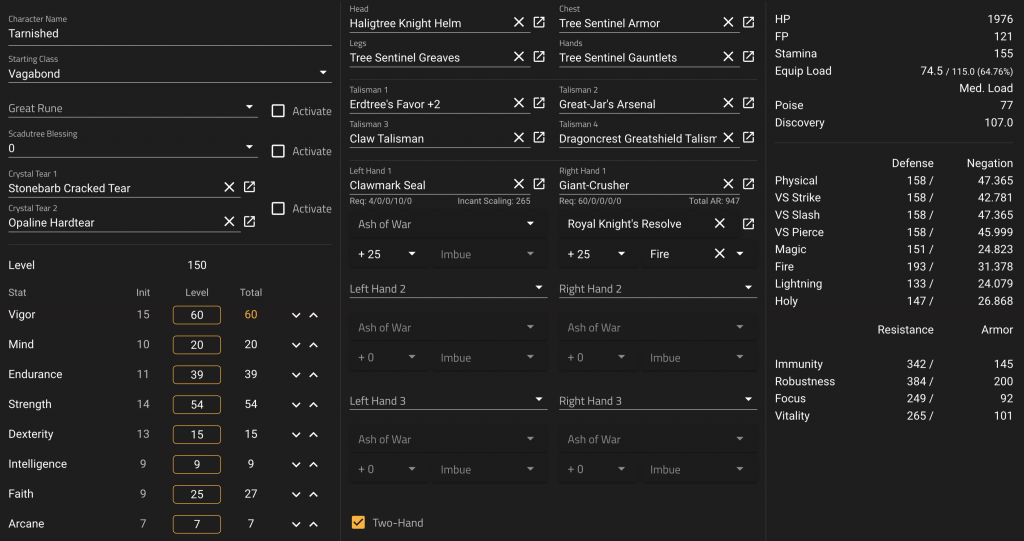
For our level 150 strength oriented melee build “The Godbreaker“, I recommend the following attribute distribution – based on the starter class Vagabond:
- Vigor: 60
- Mind: 20
- Endurance: 39
- Strength: 54
- Dexterity: 15
- Intelligence: 9
- Faith: 25
- Arcane: 7
This distribution focuses on survivability (Vigor), stamina management (Endurance), and raw damage output (Strength). The Faith investment allows for some useful buffs and incantations. Though 25 Faith might be considered high for a pure melee build, it makes perfect sense, since we want to use “Golden Vow” for buffing.
In general think about two-handing your weapon. When you two-hand a weapon, your effective Strength is increased by 1.5x for the purpose of meeting weapon requirements and calculating damage. With 54 you reach a soft cap of 80 for the Strength attribute when two-handing you weapon, what means the benefits of investing further into this attribute significantly decrease. This isn’t a hard limit, and you can still invest more points into Strength if you want, but the returns will be diminished. So, maybe think about about putting your runes into Faith and Endurance from that point onwards.
Weapons and Armor
Now, let’s have a look at the weapons we are going to wield and cause mass destruction.
Weapons
- Primary: Giant-Crusher (requires 60 Strength, when one-handed – fully upgraded)
- Secondary: Claymore (for faster attacks when needed, also fully upgraded)
Note: If you want to have both weapons equipped while wearing the recommended armor set, you need to invest 3 more points into Endurance – otherwise you have to do some swapping.
Once you reach the Shadow of the Erdtree DLC, consider replacing the Giant-Crusher with one of the following colossal weapons for a change:
- Anvil Hammer
- Bloodfiend’s Arm
Ash of War
For the Giant-Crusher use “Cragblade” in Heavy or “Endure” (effective for tanking hits and getting damage negation) or “Royal Knight’s Resolve“(boosts the damage of your next attack by 80%, if used within 10 seconds) in Fire affinity to enhance its damage output.
The Claymore comes with “Lion’s Claw” known for its ability to stagger enemies, but you can also simply swap the ashes between the both weapons or apply “Flaming Strike” to the Claymore for creating Fire damage. If you want a range option think about trying “Storm Blade“.
The Bloodfiend’s Arm also works nicely with “Royal Knight’s Resolve” or “Endure” or “Prayerful Strike” (restores health, deals notable poise damage and gives you some hyper armor).
The Anvil Hammer comes with its own Ash of War, which gives you an option for crowd control and massive damage.
Armor
In this chapter, we explore three meticulously curated armor combinations to help you thrive in the Lands Between.
Recommendation
- Head: Lionel’s Helm
- Chest: Scaled Armor
- Gauntlets: Lionel’s Gauntlets
- Legs: Lionel’s Greaves

This combination gives you 79 poise and decent damage negotiation. If you sacrifice the additional jump attack damage from the Claw Talisman (see below), you can swap to the Bull-Goat’s Talisman and reach 105 poise.
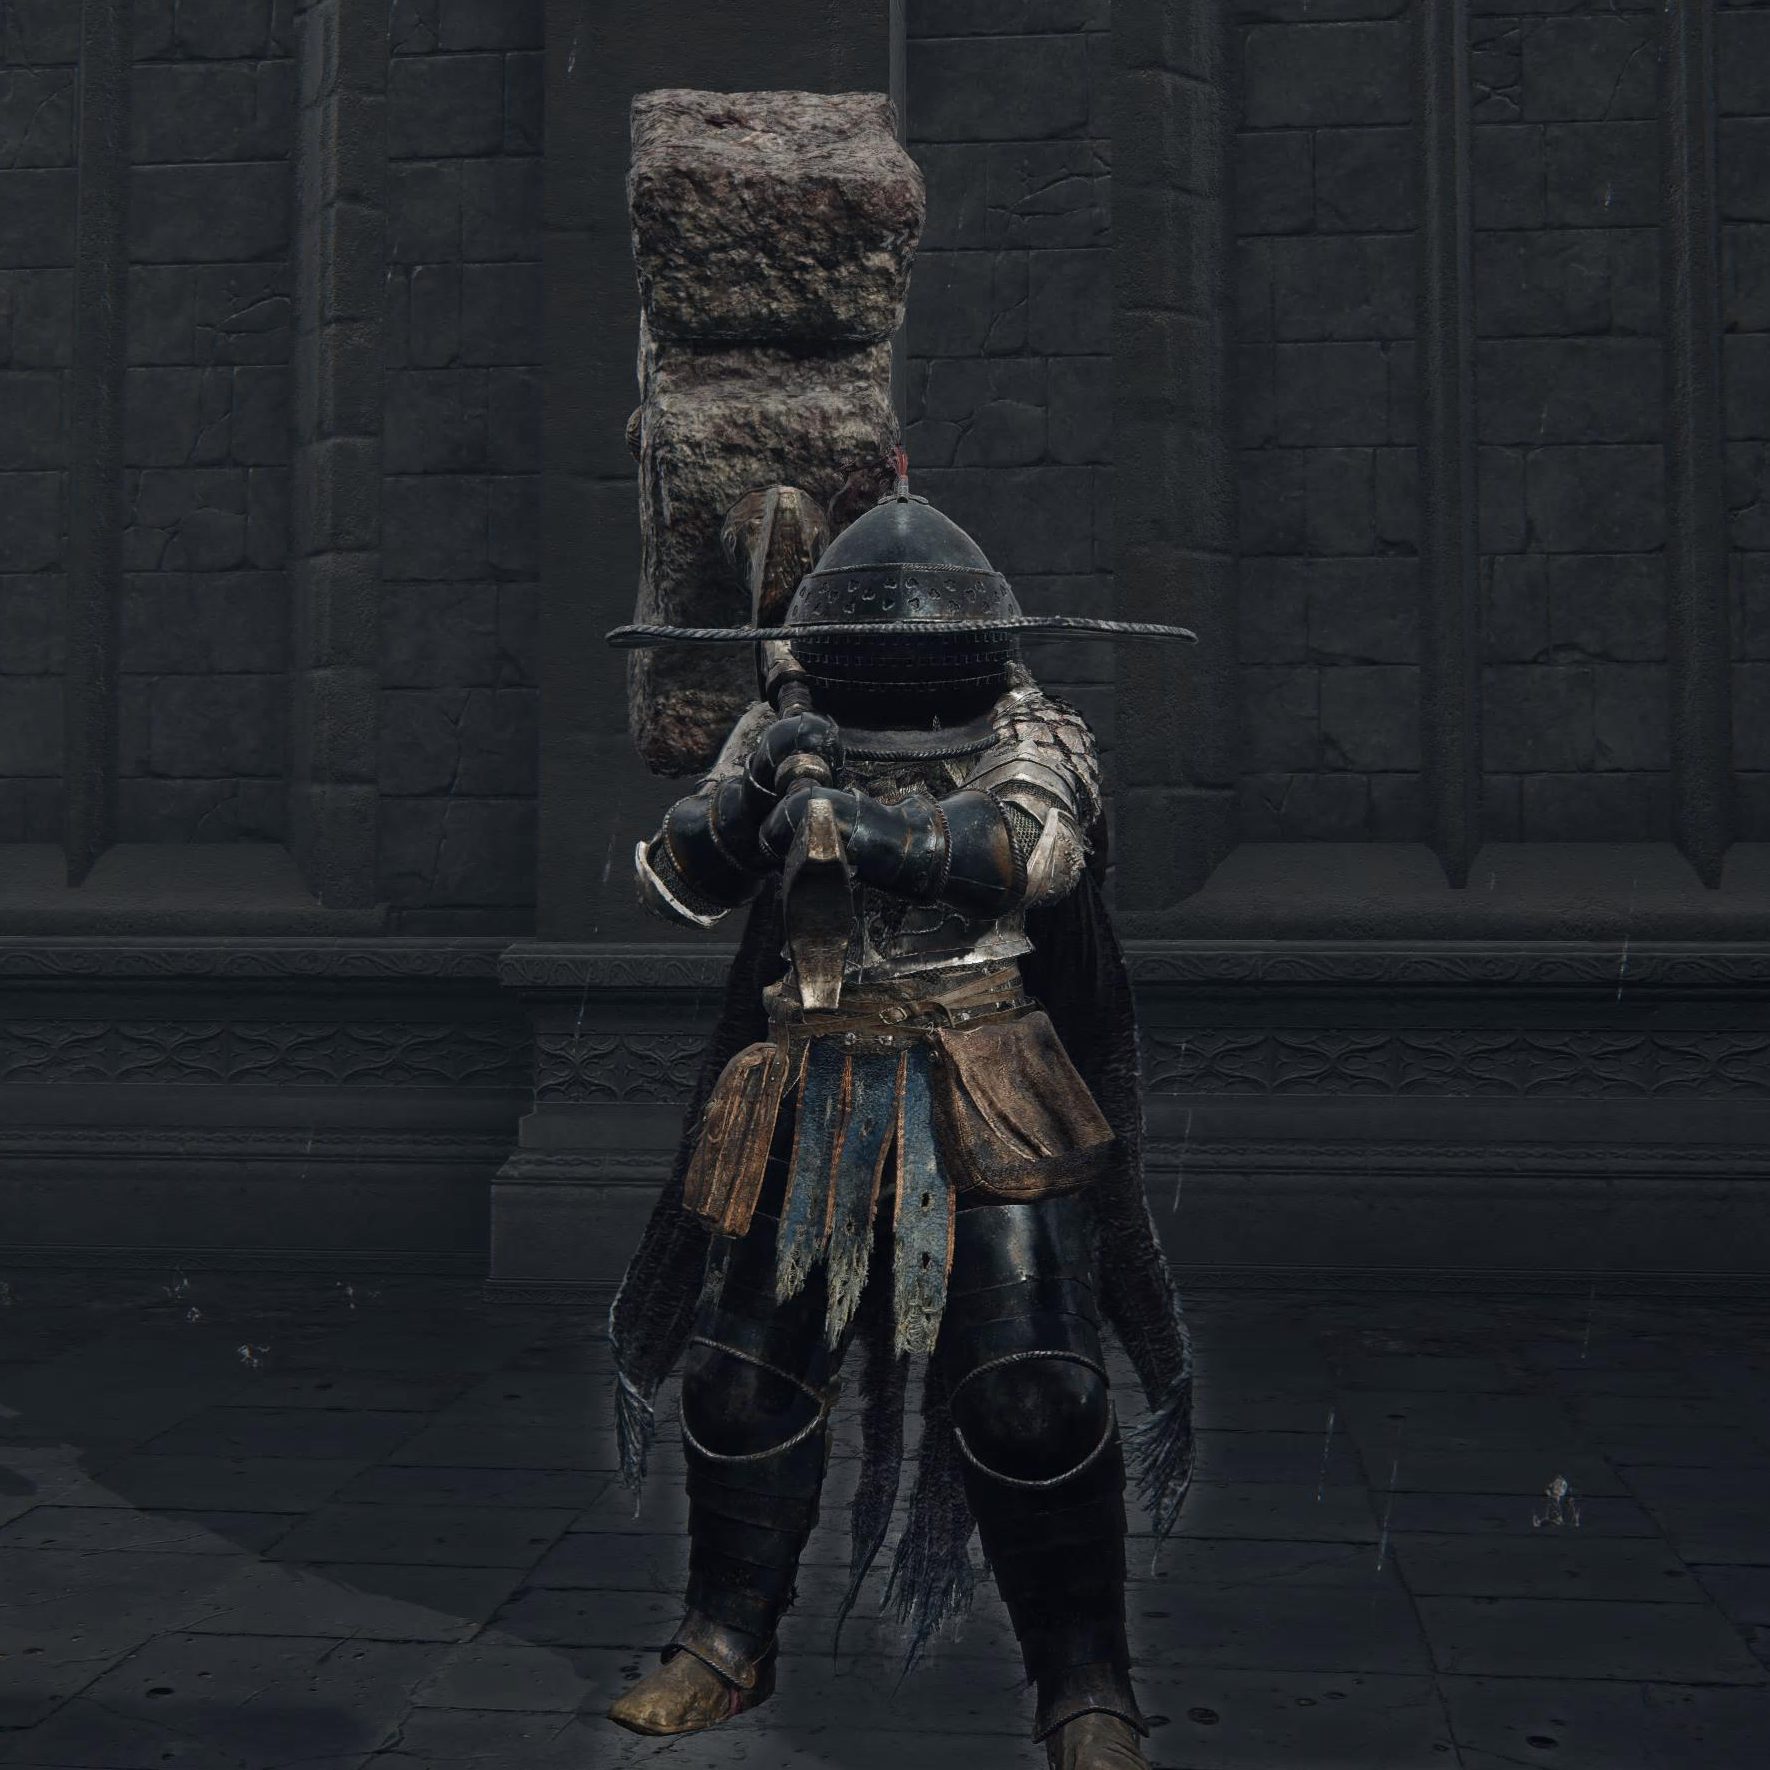
Equally Good Alternative
- Head: Haligtree Knight’s Helm
- Chest: Tree Sentinel Armor
- Gauntlets: Tree Sentinel’s Gauntlets
- Legs: Tree Sentinel’s Greaves
This combination gives 77 poise and a similar damage negotiation, but is a little lighter. As a bonus you get +2 in Faith when wearing the helm. If you swap to the Bull-Goat’s Talisman and reach 103 poise.
Kung Fu Panda or Goldfinger, the choice is your to make – but wait, there is a third option.
Go heavy – requires 45 Endurance for medium roll
- Head: Bull-Goat Helm
- Chest: Veteran’s Armor
- Gauntlets: Bull-Goat Gauntlets
- Legs: Bull-Goat Greaves

This armor set provides excellent poise (91) and physical damage negation, crucial for trading hits in melee combat – with the downside, that you have to invest 6 (if you remove the cape 5) more points into Endurance for a medium roll.
Once you reach Shadow of the Erdree you can think about the “Verdigris-Set” or the “Solitude-Set” – you can obtain both sets relatively early in the DLC.
Best Talismans
It makes sense to rearrange your Talismans based on the task at hand. We have two Talismans to give you more equipment load, one to boost damage negation and and one to enhance your jump attack damage.
Boss Fights
- Dragoncrest Greatshield Talisman (boosts physical damage negation)
- Erdtree’s Favor +2 (increases HP, stamina, and equipment load)
- Claw Talisman (enhances jump attacks)
- Great-Jar’s Arsenal (significantly increases equipment load)
Exploration of the Lands Between
Replace the Dragoncrest Greatshield Talisman with the Taker’s Cameo Talisman to regain HP upon defeating enemies.
If you switch to the Bloodfined’s Arm or the Anvil Hammer think about replacing the Claw Talisman by the Lord of Blood’s Exultation Talisman or the Two-Handed Sword Talisman (DLC) – the latter one is a good option for both weapons.
Wondrous Physick Mix
For the Wondrous Physick Flask, I recommend:
- Strength-Knot Crystal Tear (temporarily boosts Strength) or the Stonebarb Cracked Tear (makes it more likely to break the stance of an enemy)
- Opaline Hardtear (boosts damage negation by 15% for 3 minutes) or the Greenburst Crystal Tear (increases stamina recovery by 15 per second for a duration of 3 minutes).
This combination enhances your offensive capabilities while providing additional defense for tough encounters.
Useful Incantations and Spells
While this is primarily a melee build, a few incantations can provide valuable support:
- Golden Vow (boosts attack and defense)
- Flame, Grant Me Strength (increases physical and fire damage)
- Bestial Vitality (gradual HP restoration)
- Bloodflame Blade (adds blood loss buildup to a weapon)
- Stone of Gurranq (throw a boulder in a slight arc, dealing standard physical damage)
- Lightning Spear (hurl a lightning spear at enemies)
If you’re wondering which seal or staff best complements this build: The Clawmark Seal truly excels for our high-Strength character without the need to heavily invest in another stat. Assuming you intend to invest more of your future runes into Faith to access additional incantations, it provides you with a ranged and swift attack option that fits your investment in Strength and Faith – maxed out, it has a B scaling in each. Additionally it boosts Bestial Incantations by 10%.
Consumables
Consumables in Elden Ring provide a crucial edge in both combat and exploration, offering temporary buffs, healing, and offensive capabilities. Here are some notable consumables you should carry along:
Boiled Crab: Provides a temporary boost to physical damage negation, making it useful for surviving tough encounters.
Exalted Flesh: Temporarily boosts physical attack power by 20% for 30 seconds and can be crafted once you collect the Armorer’s Cookbook (3).
Kukri: These throwing knives cause Bleed buildup, which can lead to substantial damage over time.
Uplifting Aromatic: Raises attack power for the user and nearby allies while reducing damage from one incoming attack by half. This aromatic costs 22 FP to use.
Weapon Grease: Temporarily enhances weapons by adding elemental or status effects.
Gameplay Tips
- Focus on heavy jump attacks with the Giant-Crusher to stagger enemies quickly.
- Use the Claymore for faster enemies or when you need quicker attacks.
- Cast Golden Vow and Flame, Grant Me Strength before tough fights.
- Don’t be afraid to trade hits – your high poise and defense allow for aggressive play.
This build excels at staggering enemies and dealing massive damage, while having enough survivability to withstand heavy hits.
Enhance the Build Further
How about we explore a couple of ways to take your build to the next level?
Double Trouble
If you opt for lighter armor and plan to invest more runes into Endurance and Strength, consider dual-wielding two colossal weapons – provided you can maintain a mid-roll. For instance, in my post Shadow of the Erdtree: My Final Verdict On The Elden Ring DLC, I combined the Anvil Hammer with Devonia’s Hammer during my journey through the Shadow of the Erdtree DLC.
Tank Through
You can also go with “War Cry” for the Giant-Crusher and a somewhat different playstyle. Holding down R2/RT will give you a charging attack that moves you forward almost unstoppably and staggers most enemies multiple times before delivering a powerful swing. If you put the Highland Axe in your off-hand, you will receive a 10% boost for Roar damage on the Giant-Crusher. This effect also stacks with the Roar Medallion to boost your damage even further, so use this talisman instead of the Claw Talisman. For this style of play, the medium roll is not so important because your goal is to tank through attacks. Choose the heaviest armor and use the Bull-Goat’s Talisman for even more poise.
Beyond Pure Strength
Consider leaving the path of a pure Strength build. With 25 Faith already, you could transition to a Strength/Faith hybrid, enhancing your incantation damage. This approach opens up access to potent weapons with dual Strength/Faith scaling. The Anvil Hammer, which I’ve mentioned, would particularly benefit from additional Faith investment. As you approach 50 Faith, switching to a different seal could significantly boost your damage output.
Equip Load and Roll Speed
In Elden Ring, your equip load determines your roll speed, as you surely know. So just to remind you:
- Light Load (0-29.9%): Fastest roll with most i-frames
- Medium Load (30-69.9%): Standard roll, good balance of speed and i-frames
- Heavy Load (70-100%): Slow roll with fewer i-frames
- Overloaded (>100%): Cannot roll or run
For most builds, including ours, medium roll is the goal. If you don’t care for a medium roll you can go with heavy load and replace the Erdtree’s Favor +2 Talisman and the Great-Jar’s Arsenal Talisman with the Shard of Alexander and the Green Turtle Talisman for example.
Adjustments for Medium Roll
If you find yourself in heavy roll territory:
- Increase Endurance: This directly increases equip load.
- Use lighter armor pieces: Mix and match to find the right balance of protection and weight.
- Consider lighter weapons: If needed, temporarily use a lighter weapon until you can increase your equip load.
Remember, maintaining a medium roll is crucial for this build’s effectiveness. The ability to dodge efficiently while wearing heavy armor and wielding heavy weapons is a key advantage of this build.
Build Progression Guide
To help you navigate your journey from the early game to our ultimate level 150 build, here’s a roadmap of how to progress your character, equipment and tactics at different stages of the game.
Starter Class
When it comes to choosing your starter class for a melee build in Elden Ring, we focus on classes that offer high starting values in attributes like Strength, Dexterity, and Endurance. The Hero and Vagabond class are excellent choices that will provide you with a strong foundation for your melee-focused adventures in the Lands Between. Each one has its own distinct advantages – let’s have a look.
Hero Class
- Vigor: 14
- Mind: 9
- Endurance: 12
- Strength: 16
- Dexterity: 9
- Intelligence: 7
- Faith: 8
- Arcane: 11
- Strength Focus: The Hero starts with the highest Strength stat among all classes at 16, making it ideal for wielding heavy weapons and focusing on pure Strength builds.
- Starting Equipment: Equipped with a battle axe and a leather shield, the Hero is designed for high damage output and aggressive melee combat.
- Stat Allocation: The Hero has a lower Dexterity and more points in Arcane, which can be advantageous for focusing purely on Strength without needing much Dexterity.
- Playstyle: The Hero is suited for players who want to hit hard and fast, prioritizing raw damage over versatility.
Vagabond Class
- Vigor: 15
- Mind: 10
- Endurance: 11
- Strength: 14
- Dexterity: 13
- Intelligence: 9
- Faith: 9
- Arcane: 7
- Balanced Stats: The Vagabond has a more balanced stat distribution, with high Vigor and decent Strength and Dexterity, allowing for a versatile playstyle, but does not spend any points into Arcane.
- Starting Equipment: Comes with a longsword, halberd, and a shield, providing a solid mix of offense and defense.
- Flexibility: The Vagabond’s balanced stats make it easier to adapt to different weapons and playstyles, including the use of heavy armor and shields.
- Early Game Survivability: With the highest starting health (Vigor) of any class, the Vagabond offers more durability in the early game.
Ultimately, the choice between Hero and Vagabond depends on your preferred playstyle. If you want to focus on pure Strength and heavy-hitting weapons, the Hero seems to be the best choice. However, with regard to the attributes we are aiming for and if you prefer a more balanced approach with flexibility in weapon choice and higher survivability, the Vagabond is an equally good option in my opinion.
Should you not like to start with one of these classes you can also pick the Samurai, but you’ll have to invest more into Vigor and Strength right away. In the end you have to decide which starting equipment you prefer – you can’t go completely wrong.
Early Game (Level 1-60): The Foundation of Power
Welcome to the early stages of your strength-based melee build, where the foundation of your character’s power begins to take shape. In these initial levels, your focus should be on building a solid base of strength and defense, while also scouting for equipment and abilities that will set you on the path to mastery. As you venture forth, remember that each decision you make now will echo through the game ahead, reinforcing the might you will wield in the battles to come.
Character Attributes (Target Level 60)
- Vigor: 30
- Mind: 10
- Endurance: 22
- Strength: 34
- Dexterity: 15
- Intelligence: 9
- Faith: 12
- Arcane: 7
Weapons and Armor
- Weapon: Zweihander or Claymore. Initially you can collect the Lordsworn’s Greatsword near the Greatfront Ruins site of grace from a chest in the back of a carriage.
- Shield: Actually both starter classes come with a shield, but there is a recommendation anyway. Brass Shield (This medium shield is a great early-game option with 100% physical damage reduction. Buy the “No Skill” Ash of War from Knight Bernal in the Warmaster’s Shack, so that you can use the skill of your weapon.).
- Armor: Focus on medium armor pieces that offer good physical protection without heavy weight – Carian Knight Set (found in the Raya Lucaria Academy, near a large gravestone surrounded by zombies).
Ash of War
Consider using the default Ash of War “Stamp (Upward Cut)” for the Zweihander – the Claymore comes with “Lion’s Claw” to enhance stagger potential and damage output.
Talismans
- Radagon’s Scarseal (boosts several attributes)
- Crimson Amber Medallion (increases HP)
- Erdtree’s Favor (increases HP, stamina, and equip load)
Strategies
- Focus on learning enemy patterns and mastering dodging
- Use guard counters with your shield to break enemy poise
- Think about dual-wielding two Greatswords and use jump attacks for more damage – switch to the Claw Talisman for increased jump attack damage.
- Explore Limgrave, Weeping Peninsula, Liurnia, Siofra River and Ainsel River thoroughly
Roll Speed
With these stats and the suggested early game equipment, you should be within medium roll range. However, be cautious when upgrading armor, as heavier pieces might push you into heavy roll territory.
Mid Game (Level 61-90): The Forge of Destiny
As you progress into the mid game, you enter a period of transformation where your character’s raw potential is refined into a formidable force. Here, you will master the intricate dance of offense and defense, as you calibrate your build to peak efficiency. This stage is a testament to your dedication, as you hone your skills and expand your arsenal, preparing for the trials and tribulations that await in the later stages of your journey.
Character Attributes ( Target Level 90)
- Vigor: 38
- Mind: 14
- Endurance: 28
- Strength: 43
- Dexterity: 15
- Intelligence: 9
- Faith: 15
- Arcane: 7
Weapons and Armor
- Weapon: Greatsword (found in Caelid)
- Armor: Banished Knight Set (can be farmed in Stormveil Castle or the Cathedral of Dragon Communion in Caelid) or Cleanrot Set (can be farmed in Aeonia Swamp in Caelid by defeating the Lesser Cleanrot Knights). The Radahn’s Set is another good option – after you defeated him.
Ash of War
Consider using “Lion’s Claw” on the Greatsword to enhance stagger potential and damage output. Another smart option is “War Cry” – holding down R2/RT will give you a charging attack that can stagger most enemies multiple times before delivering a powerful swing (see Strategies for further information on how to adjust the build).
Talismans
- Dragoncrest Shield Talisman (replaces Radagon’s Scarseal)
- Claw Talisman (increases the damage of jump attacks)
- Erdtree’s Favor +1
- Great-Jar’s Arsenal (if you can complete the challenge in Caelid)
Spells/Incantations
- Flame, Grant Me Strength (increases physical and fire damage, requires 15 Faith)
Strategies
- Start incorporating more jump attacks into your playstyle
- Begin using weapon ashes of war more strategically
- Swap to your sword from the Greatsword class whenever you need a faster weapon. Another good alternative for your Claymore/Lordsworn’s Greatsword is the Banished Knight’s Greatsword that you can obtain from Banished Knight enemies in Caelid.
- If you go for “War Cry” think about putting the Highland Axe in your off hand (just needs to be equipped) to get a 10% boost for Roar damage on the Greatsword. It also stacks with the Roar Medallion Talisman to boost you damage even further, so use this Talisman instead of the Claw Talisman.
- Explore Caelid, Altus Plateau, Mt. Gelmir (with Volcano Manor), Lake of Rot and Deeproot Depths
Roll Speed
The increased Endurance and Great-Jar’s Arsenal should provide enough equip load for medium roll with the Greatsword and medium/heavy armor mix.
Late Game (Level 91-120): The Pinnacle of Strength
Entering the late game marks your arrival at the pinnacle of strength, where your character’s power is at its peak. This phase is a thrilling demonstration of prowess as you employ advanced techniques and specialized gear to dominate the battlefield. As you engage in epic confrontations and strategic encounters, the depth of your mastery is laid bare for all to witness. Take pride in your evolution, for you are now the embodiment of melee might.
Character Attributes (Target Level 120)
- Vigor: 50
- Mind: 15
- Endurance: 35
- Strength: 43
- Dexterity: 15
- Intelligence: 9
- Faith: 25
- Arcane: 7
Weapons and Armor
- Weapon: Giant-Crusher (found in Altus Plateau)
- Armor: Bull-Goat Set (if you’ve progressed Patches’ questline) or Lionel’s Set (Found in Lower Capital Church in Leyndell) or Tree Sentinel Set (obtained in Auriza Hero’s Grave, Leyndell) – you’ll have to replace some parts with lighter armor to retain medium roll.
Ash of War
The focus here is on mastering charged heavy attacks and jump attacks. An Ash of War like “Ground Slam” or “Endure” could complement the Giant-Crusher’s playstyle by providing additional crowd control or defensive capabilities
Talismans
- Dragoncrest Greatshield Talisman
- Erdtree’s Favor +2
- Claw Talisman
- Great-Jar’s Arsenal
Spells/Incantations
- Golden Vow
- Flame, Grant Me Strength
Strategies
- Master the timing of charged heavy attacks and jump attacks with the Giant-Crusher
- Use Golden Vow and Flame, Grant Me Strength before tough fights
- Alternatively you can put the “Golden Vow” Ash of War on a light dagger and carry it as second weapon. Even though the incantation is stronger, it gives you the chance to invest more points into Endurance and Strength at this moment of your journey and still have a lighter “Golden Vow” option before tough fights.
- Explore Mountaintops of the Giants, Consecrated Snowfield and prepare for end-game areas
Roll Speed
Endurance: 28 (Level 90) to 35 (Level 120), Great-Jar’s Arsenal and Erdtree’s Favor +2 provide significant equip load, allowing for the use of heavy weapons like the Giant-Crusher and adjusted Bull-Goat armor while maintaining a medium roll.
End Game (Level 121-150): The Legacy of the Melee Master
Reaching the end game signifies the culmination of your journey, as you solidify your status as a legendary melee master. This final chapter is an opportunity to shine, as you face the most formidable adversaries and prove your mettle against the toughest challenges. Here, your legacy is forged, as you etch your name into the annals of history, forever remembered as a paragon of strength, skill, and determination.
At this stage, you’ll be working towards the final build described at the beginning of this guide. Focus on:
- Maximizing your Vigor to 60
- Upgrading your weapons to their highest level
- Collecting any missing talismans or armor pieces
- Practicing with the full capabilities of your build against end-game bosses
Remember, the progression to this build is flexible. Adjust based on your playstyle and the challenges you’re facing. This roadmap ensures you’re always working towards the final build while remaining effective at each stage of the game.
Alternative Weapons for Melee Builds
While “The Godbreaker” build focuses on heavy weapons like the Giant-Crusher, melee builds in Elden Ring can utilize a wide variety of weapons, each offering unique playstyles and advantages. Here are some alternative weapon types to consider – DLC weapons are not yet included:
1. Katanas
- Examples: Uchigatana, Nagakiba, Rivers of Blood
- Playstyle Impact: Katanas offer a balance of speed and range. They excel at dealing both slash damage and blood loss buildup.
- Build Adjustments: Invest more in Dexterity. Consider adding Arcane for blood loss builds.
- Recommended Ash of War: Double Slash, Unsheathe
2. Spears
- Examples: Cross-Naginata, Pike
- Playstyle Impact: Spears provide excellent reach and can attack while guarding. They’re great for keeping aggressive enemies at bay.
- Build Adjustments: Balance Strength and Dexterity investments.
- Recommended Ash of War: Ice Spear, Spinning Slash
3. Curved Swords
- Examples: Scavenger’s Curved Sword, Bandit’s Curved Sword
- Playstyle Impact: Curved swords offer fast attacks and excellent mobility. They’re ideal for an aggressive, hit-and-run playstyle.
- Build Adjustments: Focus more on Dexterity over Strength.
- Recommended Ash of War: Sword Dance, Quickstep
4. Axes
- Examples: Hand Axe, Warped Axe, Rosus’ Axe
- Playstyle Impact: Axes provide a good balance of speed and power. They’re versatile weapons suitable for both crowd control and single-target damage.
- Build Adjustments: Maintain a balance between Strength and Dexterity.
- Recommended Ash of War: Wild Strikes, Barbaric Roar
5. Dual Wielding
- Examples: Dual wielding any of the above weapon types
- Playstyle Impact: Dual wielding sacrifices the ability to block for increased damage output and unique move sets. It’s a high-risk, high-reward playstyle.
- Build Adjustments: Increase Endurance for higher stamina consumption. May need to adjust attribute spread based on chosen weapons.
- Recommended Ash of War: Power Stance (inherent to dual wielding)
Adjusting the Build for Alternative Weapons
When switching to these alternative weapons, consider the following adjustments:
- Attribute Allocation: Redistribute points between Strength and Dexterity based on the weapon’s scaling.
- Talismans: Consider using weapon-specific talismans like the Curved Sword Talisman or Spear Talisman.
- Armor: Lighter weapons might allow for heavier armor while maintaining medium roll.
- Ashes of War: Experiment with different Ashes of War to find what complements your playstyle and chosen weapon.
Remember, the key to success with any weapon is practice and familiarity with its moveset. Don’t be afraid to experiment with different weapons to find what suits your playstyle best.
Conclusion
As we wrap up our journey through this guide, remember that the true beauty of Elden Ring lies in its flexibility. While we’ve outlined a powerful strength-based build, don’t be afraid to experiment and adapt it to your playstyle. The Lands Between are vast and full of surprises, and your build should reflect your unique approach to conquering its challenges.
Whether you’re facing off against formidable bosses or exploring the furthest reaches of the map, this build will serve you well. But always keep an open mind – the best Tarnished are those who learn and evolve. So take these tips, mix them with your own experiences, and forge your own legend in the Lands Between. The Elden Throne awaits, brave Tarnished – go forth and claim your destiny!
Resources
If you want to check the location of weapons, armor or whatever else mentioned in this guide, try visiting Fextralife.
Leave a Reply